
Check in with the Tickmi Studio app
The Tickmi Studio app turns your staff's phones into ticket scanners: scan QR codes or barcodes, enter codes by hand, view scan history, get operations alerts and keep checking in even when the network drops.
On this page
1. Install the app and log in
Tickmi Studio is available on iOS and Android. After installing, log in with the same account you use on the Tickmi Studio web app (see Get started with Tickmi Studio).
- Open the app, look through the intro or tap Skip.
- Enter your Email or username and Password, then tap Log in. If you forgot your password, tap Forgot password? to get a reset link by email.
- When the app asks for Camera permission, allow it. If you declined by mistake, the app shows an Open settings button so you can turn it back on.
After a password login, you can turn on Biometric login in Settings to log in with Face ID or a fingerprint next time. Biometric login cannot be combined with the Remember me box; to use Face ID or a fingerprint, uncheck that box. Check-in staff must be added to the organization first, see How check-in staff work.
2. Choose the ticket product to scan
After you log in, you can scan any ticket that belongs to your organization without choosing a ticket product first. On Home, Select ticket product lets you limit which ticket products are tracked on the stat cards. The Ticket products tab has a search box, the filters Active, Upcoming and Ended, and each product's Check-in rate. Open a ticket product to see its Daily check-in stats and its own Scan history button.
3. Scan a QR code or barcode
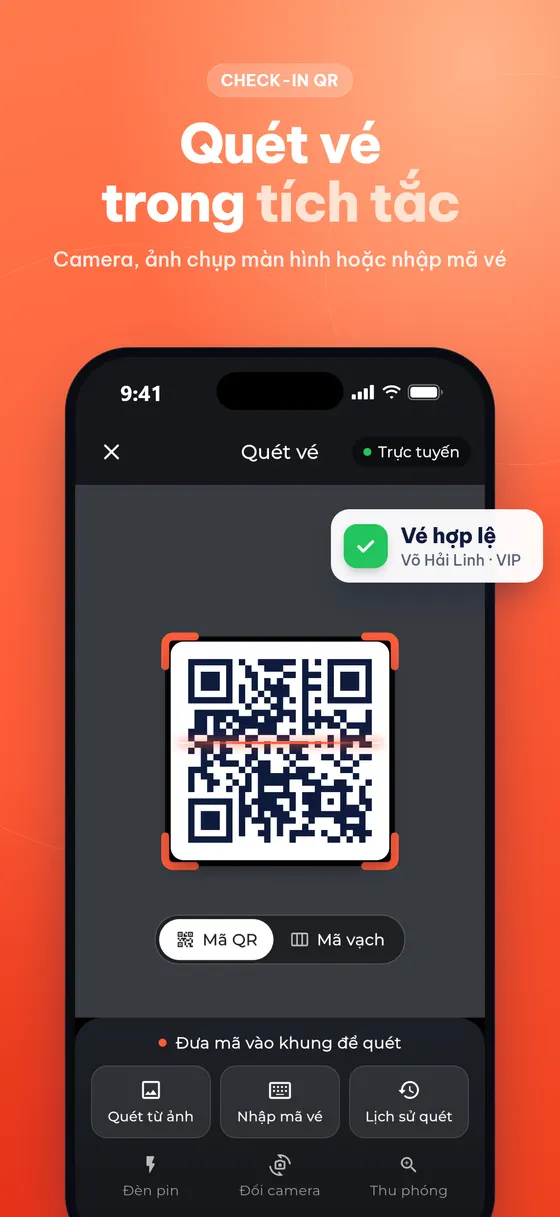
- Tap the Scan tab in the bottom bar.
- Choose the code type: QR code or Barcode.
- Hold the code on the ticket inside the scan frame. The result appears as soon as the code is read.
The Camera controls group has a Flashlight for dark venues, Switch camera and Zoom for small or distant codes. Turn on Auto-advance if you want the app to return to the scan screen by itself after showing a result. The time the result stays on screen (1, 2 or 3 seconds) is set in Settings → Auto-advance to next ticket → Display duration; you also choose the Default camera in Settings.
4. Scan from a photo and enter a ticket code
In the Input & lookup group:
- Scan from photo: pick a ticket image already on the phone and the app looks for a QR code or barcode in it. A photo taken of another screen may have streaky noise; in that case use a screenshot or enter the code instead.
- Enter ticket code: the Enter ticket No. / code manually box accepts a Ticket No. or a Ticket code (the 8 letters and digits printed on the ticket). Type the code and tap Check. Use this when the ticket is blurry, the attendee's phone screen is cracked or the device has no camera.
5. Read the result screen
| Result | Meaning |
|---|---|
| Checked in | The ticket is valid and the check-in was recorded. |
| Already used | The ticket was checked in before; the app shows the Previous check-in time. |
| Not valid yet / Expired ticket | The ticket is not active yet or its usage period has passed. |
| Invalid ticket | No ticket was found or the code is incorrect. |
| Cancelled | The organizer cancelled the ticket, so it cannot be checked in. |
| Ticket not in this organization | The ticket was issued by another organization. |
The result screen shows the Ticket No., Ticket code, Ticket product and an Additional information section with the fields the organizer allows; sensitive fields may be partly hidden. This is configured on the web, see Choose what information shows when scanning. Tap Scan next ticket to continue.
For ticket types with a Daily limit, a ticket that has used up today's check-ins cannot be checked in again until the next day (Vietnam time). To set the limit, see Daily check-in limit.
6. View scan history
Tap Scan history right on the scan screen or in a ticket product's details. The top of the list shows Total scans, Success rate and a stats bar with All, Success, Used, Invalid and Cancelled; tap any tile to filter the list by that result. Since version 1.2.6, the date button (default All dates) opens Select date range with Today, Yesterday, Last 7 days, Last 30 days, This month or Custom; the numbers at the top of the list follow the selected range, and Clear dates removes it. A scan that matches no ticket shows Code does not match any ticket. The Filter button opens Filter scan history where you choose the Source (app, Studio web, self check-in kiosk and more) and Scanned by staff; tap Clear to see everything again. Tap a row to see Scan detail. How to read each source is explained in Check-in stats by scan source and scanner.
7. Offline check-in and auto-sync
If your venue has weak signal, prepare the data before the connection drops:
- Go to More → Operations → Offline check-in.
- Tap Download offline data while you are still online. The app shows Downloaded at with the time. The data includes the tickets of your organization's ticket products that take place within 7 days before or after the download (and products with no schedule).
- When you lose the connection, the scan screen switches to Offline; keep scanning as usual. Each scan shows the line Recorded offline — will sync automatically once online.
- When the network is back, the app syncs right away while it is open; you can also tap Sync now. Pending sync tells you how many scans have not been sent yet.
Since version 1.2.4, tickets created with the free check-in tool on tickmi.com and then moved to Tickmi Studio can also be scanned offline. Older versions can only scan these tickets online, so update the app before the event day.
If two devices check in the same ticket while offline, the duplicate appears under Conflicts needing review and is marked Offline scan conflict in the history; tap Acknowledge once you have checked it. The app only syncs while it is open, so do not fully close the app on a device that still has pending scans. If you log out while scans are still unsynced, those scans stay on the device and sync the next time you log in, while the downloaded ticket data is deleted.
Tip: turn on Scan sound and Scan vibration in Settings so staff do not need to look at the screen for every scan.
8. Operations notifications
Go to More → Operations → Notifications to see organization-wide alerts. The list has the filters Unread and Important and a Mark all as read button.
| Notification | When it appears |
|---|---|
| Event starting soon | About 30 minutes before a ticket product starts. |
| Check-in milestone | A ticket product reaches 100, 500, 1,000... check-ins. |
| Data conflict | Offline sync found a duplicate check-in. |
| Waiting to sync | This device still has offline scans that have not been sent. |
To get alerts even when the app is closed, turn on Push notifications in Settings. If the app says Blocked in system settings, allow Tickmi Studio notifications in your phone's settings; if it says Push notifications are not available in this build, update the app to the latest version. Operations → Devices lists the devices using the app, their Active now or Offline status and each device's Scan count.
Want attendees to scan their own tickets? See Self check-in kiosk. Learn more about QR code check-in and Tickmi's check-in software.
Frequently asked questions
Which ticket products can the Tickmi Studio app scan?
After you log in, the app scans every ticket that belongs to your organization. A ticket from another organization shows "Ticket not in this organization".
Can I still check in if the network drops?
Yes, if you tapped "Download offline data" in Offline check-in while you were online. Scans are stored on the device and sync automatically when the network is back, while the app is open.
What is the difference between Ticket code and Ticket No.?
The Ticket code is the 8-character code of letters and digits printed on the ticket and used for check-in; the Ticket No. is the number assigned in ticket order. The "Enter ticket code" box in the app accepts both.
Who receives operations notifications in the app?
Notifications belong to the organization, so every member who logs in to the organization's Tickmi Studio app sees them under Notifications. Push notifications only reach devices that turned on "Push notifications" in Settings.
The Tickmi team is here to help on hotline 0349 632 920, or try Tickmi for free and follow along.