
Set up your schedule and sessions
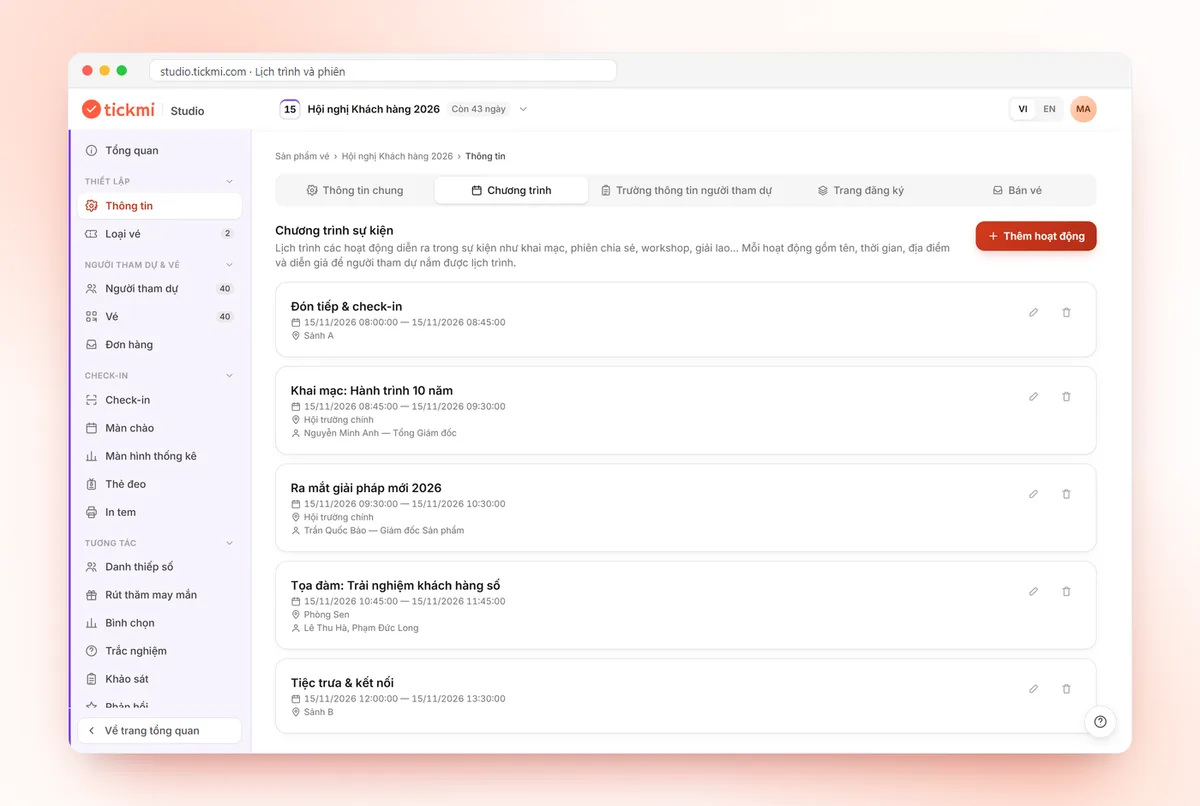
The Agenda section lets you record your whole schedule, including the opening, talks, workshops and breaks, with the time, location and speaker of each activity.
On this page
Where the agenda is
Each ticket product has its own list of activities. To open it:
- Open the ticket product from the Ticket products menu.
- In the ticket product's left menu, choose Setup → Information.
- Switch to the Agenda sub-tab.
This tab sits next to General, Guest fields, Registration page and Ticket sales (the Ticket sales tab is only visible to Owners and Admins), so you can finish all of a ticket product's details in one place. The open tab is stored in the URL, so you can send the Agenda tab link straight to a teammate. If you do not have a ticket product yet, see get started with Tickmi Studio.
Add an activity or session
- Click Add activity. While the list is empty, the page shows No activities yet. together with this button.
- Enter the Activity name (required), for example "Opening", "Talk 1" or "Design workshop".
- Add a short Description of what the activity covers.
- Choose the Start time and End time.
- Enter the Location, for example "Hall A" or the name of a meeting room.
- Enter the Speaker in charge.
- Click Save. The new activity appears in the agenda list.
Repeat these steps for every session you plan to run. For multi-day programs or several rooms running in parallel, state the location of each session clearly so your team and attendees can follow along easily.
Edit and delete activities
- Each row in the list shows the name, time range, location and speaker so you can scan the whole schedule quickly.
- To edit, click the pencil icon at the end of the row, change the details in the Edit activity dialog and click Save.
- To delete, click the trash icon on that row. The Delete activity dialog asks for confirmation first, because deleting cannot be undone.
Tips for organizing your schedule
| Type of activity | What to include |
|---|---|
| Welcome and check-in | Opening time, check-in area |
| Opening, main sessions | Speaker, hall |
| Workshops, parallel sessions | Each session's own room, the facilitator |
| Breaks, networking | Duration, area |
Short, consistent activity names make the list easier to read when you print it or share it with your team.
Where the schedule appears
The activity list in the Agenda tab is the official schedule of the ticket product, used so everyone in your organization knows the plan. To let attendees see the schedule, you add the content to the pages they receive:
- Registration page: in the registration page template designer, open the Library panel, the Details & ticket group, add the ready-made Agenda section and fill in the times and activities. See create a registration page.
- Ticket email: the Library panel of the email designer also has an Agenda section, handy for reminding people of the schedule along with their ticket. See design emails.
The Agenda section in the designer is content you type yourself; it does not pull from the Agenda tab automatically. When a session's time changes, update both the Agenda tab and the registration page and email templates in use so the information stays consistent.
The overall time and location of the whole ticket product (used for the Add to calendar button, Get directions on the ticket and the auto-filled variables in emails) are in the General tab, not in each activity.
Check again before the event
Before you send tickets and open registration, run through the schedule with this checklist:
- Each activity's start and end time has the right date and was not mistyped.
- Parallel sessions have different locations and complete speaker details.
- The welcome time in the Agenda tab matches the check-in opening time your team agreed on.
- The Agenda section content on the registration page and in the ticket email matches the latest version of the schedule.
If something changes close to the event, edit the activity in the Agenda tab first, then update the templates in use, so everyone on the team works from a single version of the schedule. This habit also saves you from answering the same question twice when attendees ask what time a session starts.
Next steps
Once the schedule is clear, you can prepare interactive activities for each session such as polls, quizzes, surveys and feedback or a live lucky draw. Learn more about Tickmi's online registration page and check-in software.
Frequently asked questions
What information does each activity in the agenda include?
The activity name, description, start time, end time, location and speaker.
Does the schedule automatically appear on the registration page?
No. You add the Agenda section from the Library panel in the registration page or email template designer and type the content yourself, so you need to update both places when the schedule changes.
Can I set up several sessions that run at the same time?
Yes. Each activity has its own time and location, so you can set up parallel sessions in different rooms.
The Tickmi team is here to help on hotline 0349 632 920, or try Tickmi for free and follow along.