
Design e-tickets and use the template library
The Tickmi Studio ticket designer lets you drag text, images, QR codes and barcodes onto a ticket, insert each attendee's own auto-filled info, and assign a template to each ticket type.
On this page
- 1. Create a ticket template or pick one from the gallery
- AI template suggestions
- 2. Get to know the designer
- 3. Multi-page tickets
- 4. Insert attendee info
- 5. Fonts and images
- 6. QR codes and barcodes
- Customize the QR code style
- Code 128 and PDF417 barcodes
- 7. Preview and test render
- 8. Assign a template to a ticket type
1. Create a ticket template or pick one from the gallery
Ticket templates are managed for the whole organization under Template library → Ticket & card templates. The gallery also has an Invitations tab: pick an invitation type, then a template, and you get a card-style ticket template to use as the card image for the invitation page. One template can be reused across many ticket products.
- Go to Ticket & card templates.
- Click Create template, enter a Template name, then click Create and open the designer.
- Or click Choose from gallery to start from a ready-made template, then adjust it to match your brand. Templates hand-picked by Tickmi carry the CURATED label.
You can search templates by name and sort them by Recently updated, Newest first or Name A-Z. Each template has Edit, Duplicate and Delete actions. Note: ticket types that use a template are affected if you delete it.
If you no longer need a template, click Hide template (a confirmation box appears): it disappears from the library and from template pickers, while places already using it keep working. The Filter by status box offers Active (default), Hidden or All; switch to the Hidden filter to click Unhide.
AI template suggestions
The gallery holds hundreds of templates. If you are not sure where to start, use the AI template suggestions box at the top of the ticket template gallery.
- Open the gallery from a ticket product (when assigning a template to a ticket type): the AI reads the product's name and description and picks the 3 best matches. You can add your wishes for color or style.
- Open the gallery from the Template library: type a short description of your event, for example "elegant gold wedding party".
Click Suggest, review the 3 templates, then click Use this template on the one you like, or Suggest again. Each suggestion uses 1 AI credit from your organization and no attendee information is sent to the AI. If the AI is busy or cannot find a really good match, you can still pick manually in the gallery below as usual.
2. Get to know the designer
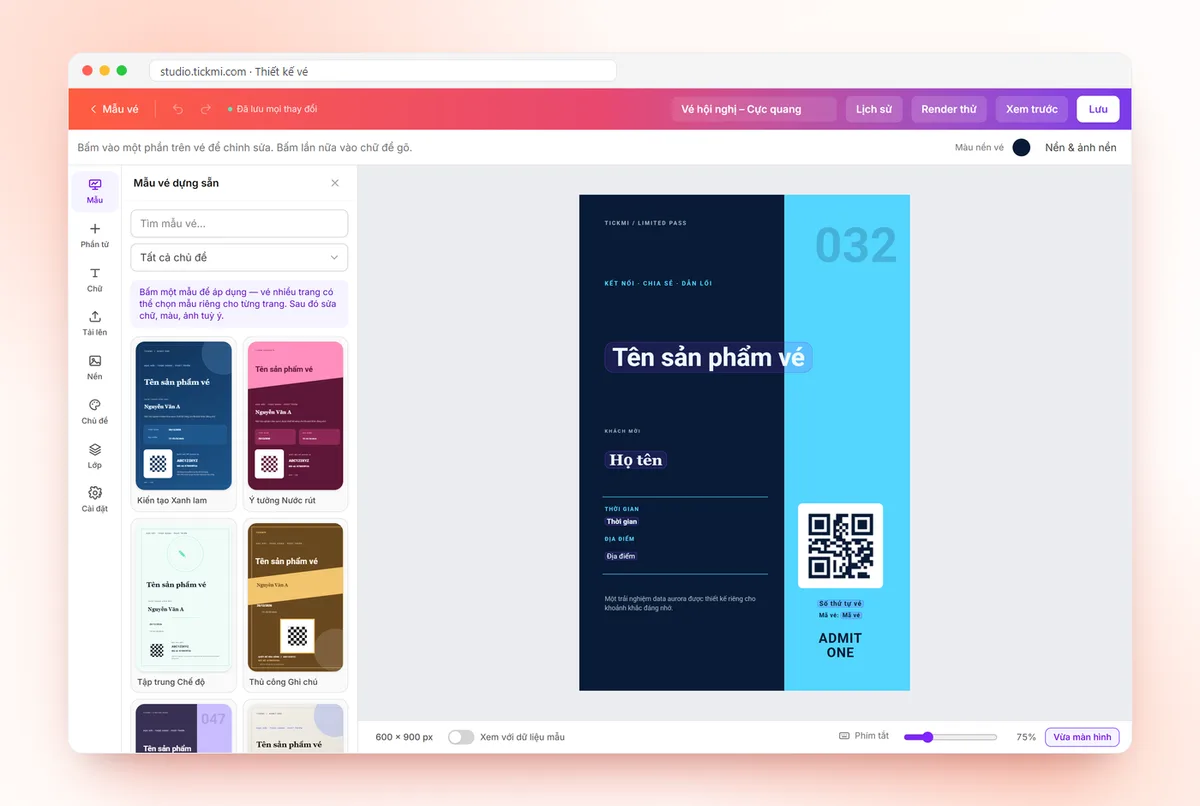
The left sidebar of the designer has these tabs:
- Templates: ready-made ticket templates; search by name or filter by theme. Click a template, then choose Use template; you can undo with Ctrl+Z.
- Library: groups of ready-made elements (title blocks, info frames, decorations...) to drop into the ticket you are working on.
- Elements: text, images, shapes, stickers, frames, QR code, Barcode, buttons and links. Click to add to the center of the ticket, or drag to the position you want.
- Text: heading styles, accent lines, body paragraphs and the Auto-filled info group.
- Uploads: your own images (logo, sponsor images...).
- Background: background color, preset backgrounds or Upload a background image; there is also an option to Match ticket size to the image.
- Theme: recolor the whole ticket in one click while keeping text readable; you can turn on Also change fonts to match the theme.
- Layers: the list of layers on the ticket, to select, hide or reorder.
- Settings: Ticket size and Pages.
Click any part of the ticket to edit it, and click text again to type. Font, color, text size, effects, corner radius, locking an element (Ctrl+L), copying to another ticket template (Ctrl+C) and more are in the toolbar at the top.
3. Multi-page tickets
In the Settings tab, the Pages section lets you click Add page to make a front and back side. When tickets are issued, each page becomes one image. When you apply a template to a multi-page ticket, you choose Apply to page (the page that is open) or Replace the whole design (all pages).
4. Insert attendee info
This is what makes each ticket carry the right name, company, ticket type and more for each person.
- Select a text block on the ticket.
- Click Auto-filled info in the toolbar and choose the field to insert.
- When tickets are issued, the system replaces it with the real data of each attendee.
The auto-filled info list is split into three groups:
| Group | Info |
|---|---|
| Attendee | Guest name, Guest email, Phone number, Note and any custom fields |
| Ticket product | Ticket product name, Date & time, Location, Start date/time and End date/time, Weekday, Day (dd), Month (MM), Year (yyyy) |
| Ticket | Ticket type, Ticket No., Ticket code, QR / barcode string |
Ticket No. is a number that increases within the ticket product; Ticket code is an 8-character code of letters and digits that attendees type at the self check-in kiosk, or that staff enter when a QR code can't be scanned. Print the Ticket code on the ticket so attendees have a fallback.
For long names, set Max lines so the text is cut off with "..." instead of overflowing its box. If the ticket product has a photo-type field, click Attendee photo in an image's toolbar so each ticket prints that person's own portrait.
The Conditional display section → Show only when… lets an element appear only when a field equals, is not, contains, has a value or is empty, for example printing a "VIP" label only for VIP attendees. Matching is case-insensitive.
5. Fonts and images
Besides the built-in fonts, you can Upload font (.ttf, .otf, .woff or .woff2 files, up to 8 MB) or choose Computer fonts on a recent version of Chrome or Edge. Fonts are embedded in the ticket template, so issued tickets show the right font even on devices that do not have it installed. Pick a font that supports all the Vietnamese diacritics you need (if your audience uses them) and that you are licensed to use.
Images can be adjusted with Image fit, corner radius, blur, black and white, Circle crop and horizontal/vertical crop points.
6. QR codes and barcodes
The QR code element on a template is only a placeholder for position; each ticket's real QR code is generated automatically when the ticket is issued.
Customize the QR code style
- Presets: Default, Classic, Soft round, Tickmi orange, Navy, Ocean.
- Dots (Square, Rounded, Dots, Leaf, Connected) and Eyes (Square, Rounded, Circle and variants with dot or soft centers).
- Colors: code color, Dot gradient (Diagonal, Vertical, Radial), separate colors for the Eye frame and Eye center, and a Transparent background.
- Logo: Upload logo and adjust the Logo size; when a logo is present, error correction is fixed at H (30%).
- Margin, radius, error correction: the quiet zone around the code and the L/M/Q/H error correction level (M is recommended).
Code 128 and PDF417 barcodes
The Barcode element encodes the same string as the QR code, so the check-in app and barcode scanners read it just like a QR code. Choose the Barcode type, turn on Show code text under bars if you want it, change the Bar color and Background, or choose No background. Code 128 needs a width of at least about 480px, and the designer shows ⚠ Too narrow if the bars get too thin; for small layouts use PDF417. See also web check-in and barcode scanners.
Tickmi test-decodes your QR code and barcode as you edit. If the colors are too light, the contrast is too low or the logo is too big, the designer shows ⚠ Hard to scan, ⚠ This style does not scan or ⚠ Barcode will not scan and blocks saving the template (including autosave) until you fix it.
7. Preview and test render
- Preview with sample data in the bottom bar: a quick look at the ticket with the auto-filled info replaced.
- Test render: creates a ticket image with the real ticket issuing pipeline (fonts, line clamping, QR/barcode, display conditions) using sample data. It usually takes 2–5 seconds, needs no saving and uses no ticket issuance quota.
- History: older versions are saved automatically at most once every 10 minutes and the last 30 are kept; click Restore to go back.
When printing paper tickets, open Layout aids and turn on Print guides (3mm bleed, 5mm safe): extend the background to the red line, and keep text and QR codes inside the blue line.
8. Assign a template to a ticket type
- Open the ticket product and go to Setup → Ticket types.
- Click Add ticket type, or open an existing ticket type, on the General tab.
- Choose a Ticket template (or Pick a ticket design, Design my own) and the Issued ticket file format: Image, PDF or HTML.
- Click Save. Tickets issued after that use the new template.
If you edited the template after tickets were issued, use Re-issue tickets; see re-issuing tickets. Next, design the ticket email or learn more about e-ticket design with Tickmi.
Frequently asked questions
Can one ticket template be used for several ticket products?
Yes. Ticket templates live in your organization's shared library, and you pick one when configuring each ticket type.
Why can't I save my ticket template after changing the QR color?
Tickmi test-scans the QR code and barcode on the template. If the color is too light, the contrast is low or the logo is too big, the template is not saved until you change the dot style, use a darker color or shrink the logo.
Can I use my brand's own font, including Vietnamese diacritics?
Yes. Use Upload font with a .ttf, .otf, .woff or .woff2 file up to 8 MB; the font is embedded in the template, so issued tickets show the right font.
If I edit a template, do already-issued tickets change automatically?
No. Select the tickets in the Tickets tab and use Re-issue tickets to rebuild the QR images and ticket files from the latest design.
The Tickmi team is here to help on hotline 0349 632 920, or try Tickmi for free and follow along.