
Create a registration page for a ticket product
A registration page lets attendees sign up for tickets themselves through a link that carries your brand. You decide who gets a ticket right away, who needs approval, and how many times each person can register.
On this page
- How the registration page works
- Step 1: Prepare the registration page template
- Choose the fields on the registration form
- Step 2: Open registration for a ticket type
- Step 3: Turn on the registration page for the ticket product
- Step 4: Choose automatic or manual approval
- Step 5: Choose how tickets are delivered after registration
- Next steps
How the registration page works
The registration page has three separate parts to configure:
- Registration page template: the look of the page, shared across the organization.
- Ticket types open for registration: which ticket types can be registered, how many tickets per registration, limits per email or phone number, and whether registrations are approved automatically.
- The ticket product's registration page: choose the template, turn on the public link and decide how tickets are delivered.
Registration tickets are free tickets. If you want to charge for tickets, use the sales settings of the ticket type, see sell tickets online.
Step 1: Prepare the registration page template
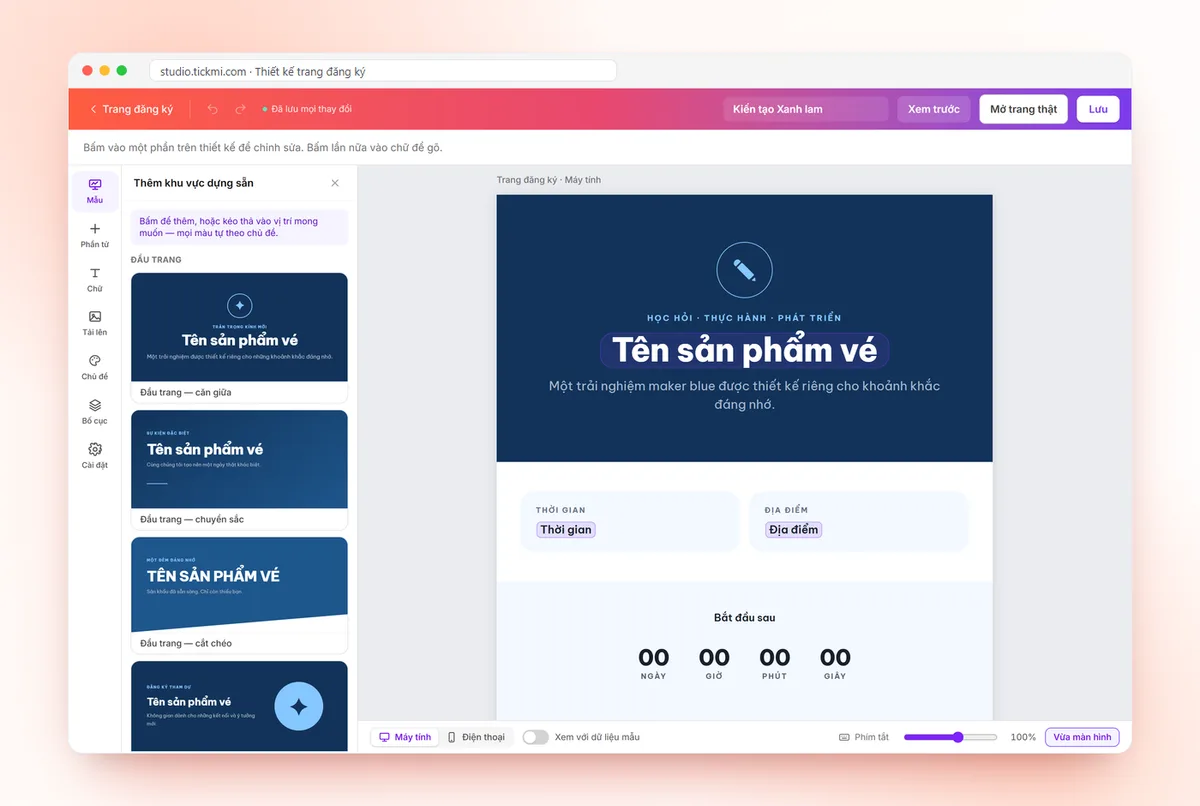
- In the main menu, go to the Template library group → Registration page templates.
- Click Choose from gallery to start from a ready-made template, or Create new template, give it a name and click Create & design.
- The designer has these panels on the left: Templates (replace the whole page with a ready-made template), Library (ready-made sections such as header, time and venue, agenda, speakers, sponsors, FAQ and footer), Elements, Text, Uploads, Theme, Layout and Settings.
- Click a part of the design to edit it, and click the text again to type. The Theme panel changes the colors and fonts of the whole page to match your brand. For help with wording in a text block, click ✨ Write for me in the editing panel on the right (see Write for me).
- Click Save. In the template list, use Duplicate to create a new version without affecting the original.
The registration page's Elements panel also has Registration form, Countdown, Map, Video, FAQ and Gallery. A countdown left empty counts down to the ticket product's start time on its own; the map has a Use the ticket product location button. The same design style works for ticket emails, see design emails.
Choose the fields on the registration form
Select the Registration form element to open Information guests fill in. Turn on Show to put a field on the form and tick Required if registrants must fill it in. Full name is always shown and required, and the ticket type selector is always there. A field newly added to the ticket product shows up automatically (not required) until you turn it off. Click a field's name to change its display name; the Submit button lets you change the button text. Input rules (digits only, exact length, email and so on) come from the attendee information fields, and the form shows an error right away when a registrant enters something wrong.
When a template is no longer used, click Hide template (with a confirmation box): the template no longer appears in the library or wherever templates are picked, while places already using it keep working normally. The Filter by status box lets you choose Active (default), Hidden or All; open the Hidden filter to click Unhide.
The same designer is used for a product's Invite page (Information → Invite page tab). See invite page for every ticket product.
Step 2: Open registration for a ticket type
- Open the ticket product, go to Setup → Ticket types and choose the ticket type to open (or Add ticket type).
- Switch to the Registration tab and turn on Allow registration.
- Enter the Maximum tickets per registration: 1 if each person only registers for themselves, higher if you allow registering together with companions.
- If needed, set Max registrations per email and Max registrations per phone number. Leave them empty for no limit; only active (not cancelled) registrations of this ticket type are counted, and 0912… and +84912… are treated as the same number.
- Set the Registration opens and Registration closes times.
- Choose whether to turn on Automatically approve registrations (see step 4), then click Save.
A ticket type that is open for registration shows the Registration enabled label in the ticket type list. The ticket type's total capacity still follows the Number of tickets field in the General tab.
Step 3: Turn on the registration page for the ticket product
- Go to Setup → Information → the Registration page tab.
- In the Page design & ticket delivery section, at Select registration page template, choose the template you prepared in step 1. If the organization has no template yet, click Create a template now.
- Turn on Enable public access to get the Public link — Registration, choose the language for attendees and then copy the link or QR code.
- If you like, use Change code (URL) and then Save code to set an easy-to-remember address. The old link stops working after you change it.
- Click Save, then send the link to attendees by email, on social media or print it as a QR code.
If the ticket product is hidden, people who open the link will see "Invalid link". Click Unhide at the top of the ticket product page before sharing the link.
Step 4: Choose automatic or manual approval
| Approval method | Best when | Attendee receives the ticket |
|---|---|---|
| Automatically approve registrations (on) | Open events where anyone who registers can attend | Right after registering |
| Manual approval (off) | You need to screen or limit the audience | After the organizers approve |
With manual approval, registrants see the message Registration successful! Your ticket will be sent after the organizer approves. and appear under Attendees with the status Pending approval and the source Self-registration. You can:
- Approve one person with the Approve this guest button.
- Select several people and click Approve selected.
- Approve everyone waiting with Approve all.
For details, see approve attendees.
Step 5: Choose how tickets are delivered after registration
In the Page design & ticket delivery section, the option Show the ticket immediately after registration lets attendees see their ticket on the page right away. It only applies when every ticket type the attendee chooses has automatic approval on. Otherwise, the ticket arrives by email once approved (when the ticket type has email sending on), or via Zalo if the ticket type has Zalo sending on.
Ticket views right after registration are logged under History → Ticket view on registration. Attendees can also look at their ticket again on the personal ticket page.
Next steps
Once you have registrations, you can ask who is definitely coming with attendance confirmation, then prepare the welcome desk with check-in with the app or the self check-in kiosk. Learn more about Tickmi's online registration page.
Frequently asked questions
Is there a limit on how many tickets one person can register?
Yes. Each ticket type has Maximum tickets per registration, plus Max registrations per email and Max registrations per phone number in the Registration tab.
Does renaming the ticket product change the registration link?
No. The address does not change when the ticket product's name changes. The old link only stops working when you deliberately use Change code (URL).
How do I make registrants fill in a company name?
Create and turn on a Company field for the ticket product, then in the designer select the Registration form element, turn on Show and tick Required for that field.
Why can't attendees see their ticket right after registering?
The option Show the ticket immediately after registration only applies when every ticket type the attendee selects has Automatically approve registrations on. For manually approved ticket types, the ticket is issued after you approve.
The Tickmi team is here to help on hotline 0349 632 920, or try Tickmi for free and follow along.