
The attendee's personal ticket page
Every ticket issued through Tickmi has its own page on the phone: attendees open the QR code to check in, download the ticket, add it to their calendar, get directions and create a digital card, with no app to install.
On this page
1. Where attendees open the ticket page
The personal ticket page is a web page that opens in any phone browser. Attendees usually get to it through:
- The Ticket button element in the ticket email, see designing the ticket email.
- The view-ticket button in the Zalo message if the ticket type has ticket delivery via Zalo ZNS turned on.
- The ticket page shown right after registering on the registration page (when showing the ticket immediately is on), or the View your ticket button on the attendance confirmation page.
Organizers can open anyone's ticket page from the Tickets tab with the Open e-ticket button. If one order contains several tickets, the page shows them one by one with an indicator such as Ticket 1/3; attendees click Previous ticket / Next ticket or the indicator dots to switch.
2. What the ticket shows
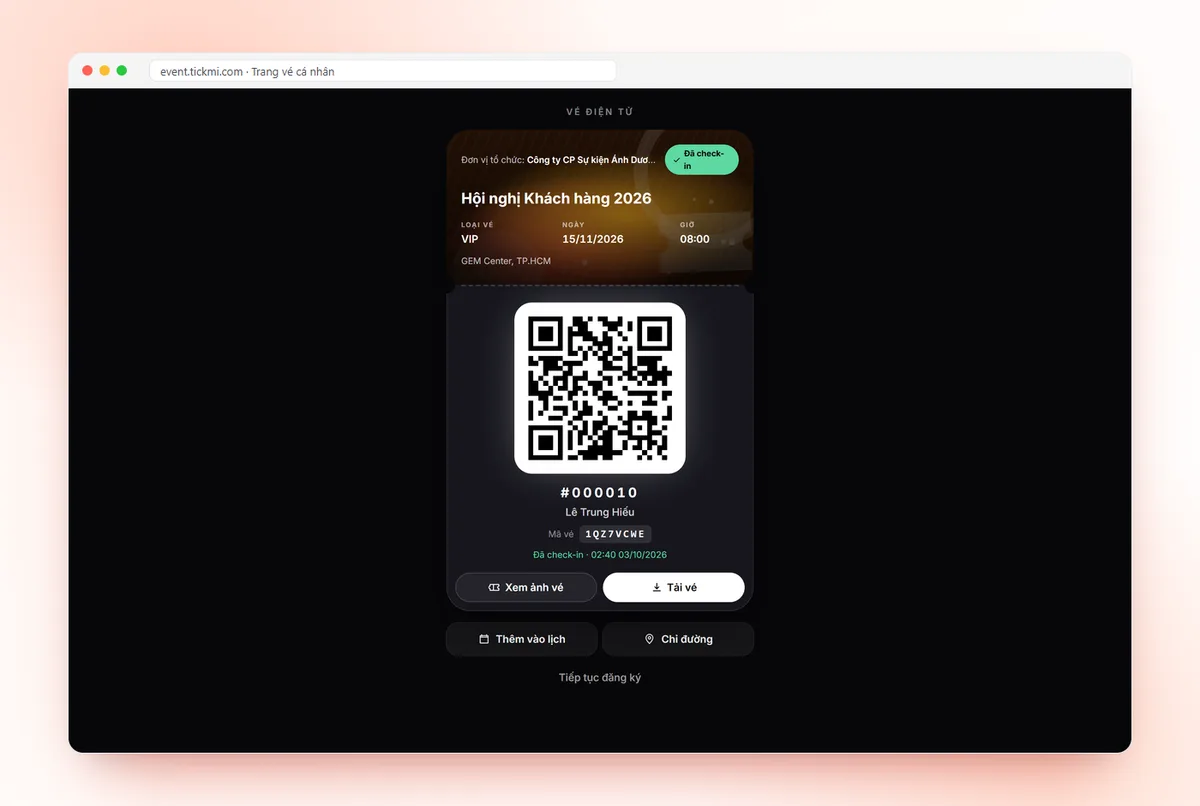
The ticket page looks like an e-ticket card and includes:
- The ticket product name and the Organizer.
- The Ticket No. (in the form #000123) and the attendee's name.
- The 8-character Ticket code: attendees type it at a self check-in desk, or staff enter it when the QR code cannot be scanned.
- The Ticket type, start Date and Time.
- The Ticket QR code to scan at check-in.
- Status: a Checked in label with the time, or Ticket cancelled.
If the ticket was just created, the page shows Preparing your ticket... and keeps checking until the ticket file is ready; if it takes too long, it asks the attendee to reload the page after a few minutes.
3. View the QR code or ticket image, and download the ticket
- By default the page shows a large QR code. Click Show ticket to see the exact ticket file designed for that ticket type, and click Show QR to go back.
- Click Download ticket to save the file to the device. If the download does not work, attendees can press and hold the image to save it.
- For PDF/HTML tickets, the page has an Open ticket file button that opens it in a new tab.
When opened in Zalo, Facebook or Messenger
The built-in browsers of these apps often cannot download files. In that case the Download ticket button opens the ticket image full screen with the hint Press and hold the ticket image to save it and a Copy ticket link button to open it in Chrome/Safari. The Add to calendar button is also hidden in built-in browsers.
The ticket template shown here is created following the guide to ticket design and the template library.
4. Add to calendar and directions
- Add to calendar: shown when the ticket product has a start time; click it to download a calendar file and add it to the phone's calendar app.
- Directions: shown when the ticket product has a location; click it to open Google Maps for that place.
So fill in the start time and location under Setup → Info → General of the ticket product, see get started with Tickmi Studio.
5. Create a digital card from the ticket page
When the ticket product has Digital cards turned on (group Interaction → Digital cards), the ticket page shows an extra tile, Create your digital business card.
- The attendee clicks the tile and reads the Before you create a digital card terms.
- They fill in their contact details and choose for each item whether it is Public or Hidden.
- They click Agree & create card, then share it by link or QR code.
Next time, the tile changes to Your digital business card so they can see the link, edit details or remove the card. Organizers only see the number of cards and views, not the content. See digital business cards for details.
6. Tips for organizers
- Remind attendees to open the ticket page and turn up their screen brightness before they reach the gate, so scanning is fast.
- When a ticket is cancelled in Studio, the ticket page shows a Cancelled stamp over the QR code, the download button is locked and a message tells attendees to contact the organizer.
- At the bottom of the ticket page, a Continue registration link leads back to the ticket product's registration page, handy when attendees want to register companions too.
- The ticket page link is unique to each ticket; anyone with the link can view the ticket, so advise attendees not to post it publicly.
7. Track ticket views in Studio
In the ticket product, the History group has Ticket view on registration, which records every time an attendee viewed their ticket through the public page. Together with the Tickets tab, you can see which tickets were issued, emailed or sent over Zalo, and checked in. When an attendee says they have not seen their ticket, check their email or phone number in the attendee list, fix it if it is wrong and resend, see resending tickets.
Learn more about QR code check-in and checking in with the Tickmi Studio app.
Frequently asked questions
Do attendees need to install an app to see their ticket?
No. The personal ticket page is a web page that opens directly from the link in the email or Zalo message, in the phone's browser.
What if the QR code cannot be scanned?
The ticket page shows an 8-character Ticket code; attendees type it at a self check-in desk, or check-in staff enter it instead of scanning the QR code.
The ticket link opened in Zalo will not download. What now?
Click Download ticket to open the ticket image full screen and press and hold the image to save it, or click Copy ticket link and open it in Chrome/Safari.
Why does the ticket page have no Directions button?
The Directions button only appears when the ticket product has a location. The Add to calendar button only appears when there is a start time, and it does not show in the built-in browsers of Zalo and Facebook.
The Tickmi team is here to help on hotline 0349 632 920, or try Tickmi for free and follow along.