
Design ticket emails and send from your own domain
Tickmi Studio has a drag-and-drop email designer so you can build branded ticket emails yourself, and lets you send through your organization's own SMTP server so recipients see your domain.
On this page
- 1. Create an email template
- 2. Write the email with the drag-and-drop designer
- Insert tickets and auto-filled info
- Write for me
- 3. Subject, CC and reusing a design
- Dark mode, link checks and the invitation page link
- 4. Preview before you use it
- 5. Assign an email template to a ticket type
- 6. Send ticket emails from your own domain (SMTP)
- Change only the sender name
- Send from your own address
- 7. Track email history and per-person errors
1. Create an email template
Email templates are shared across the whole organization and live under Template library → Email templates. You pick a template when you turn on automatic emails for each ticket type.
- Go to Email templates.
- Click Create email template, enter a Template name and click Create & open editor; or click Browse gallery to start from a ready-made template.
- In the list, each template has Edit, Copy and Delete. If you delete a template that is in use, that ticket type cannot send emails until you choose another template.
2. Write the email with the drag-and-drop designer
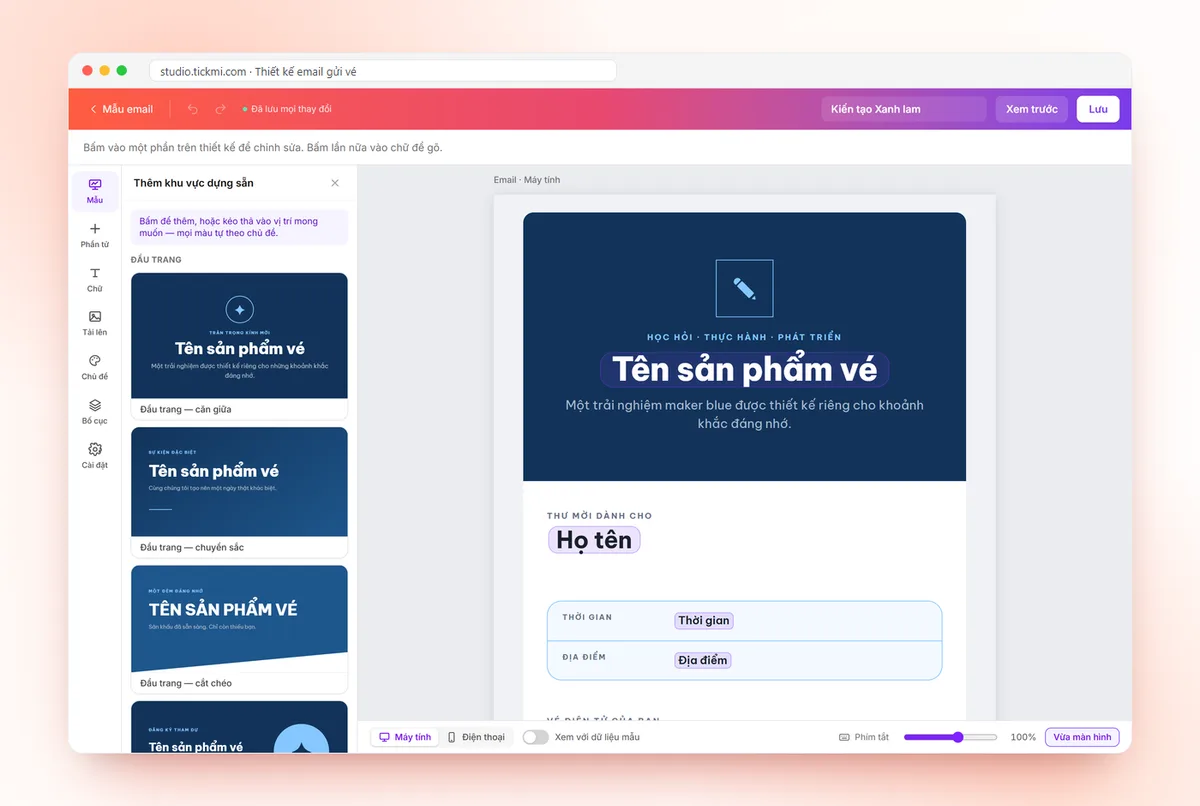
The email designer has these panels on the left:
- Templates: replace the whole email with a ready-made template (undo with Ctrl+Z).
- Library: ready-made sections grouped as Headers, Details & ticket, Body text, Calls to action, Images & video, Speakers & partners and Footers. All colors follow the theme automatically.
- Elements: Text, Image, Button, Icon, Details, E-ticket, Ticket button, Confirm link, Divider, Spacer and Social links.
- Text: text styles and the Text with guest info group, such as a greeting with the attendee's name.
- Uploads, Theme (colors and fonts for the whole email), Layout (drag to reorder sections) and Settings.
Click a part of the design to edit it, and click the text again to type. Select a whole section to change Columns, background, shape and spacing.
Insert tickets and auto-filled info
- The E-ticket element: each attendee's real ticket image appears here when the email is sent.
- Ticket button: each recipient gets a personal link to their personal ticket page to view the ticket and create a digital card; you can choose the Ticket page language.
- Confirm link: each recipient gets a personal link to reply whether they will attend, see attendance confirmation.
- The Insert info button on the text toolbar: it is replaced at send time with the attendee's full name, email, phone number, note, custom fields, ticket product name, time, location, ticket type name, Ticket No. and Ticket code.
Put the Ticket code in the email so attendees can type it at a self check-in desk when their phone cannot show the QR code.
Write for me
Stuck on the wording of an invitation or reminder? Select a text block, and in the right-hand panel click ✨ Write for me (just below the Edit text button).
- Choose a Purpose: Invitation, Registration confirmed, Reminder, Thank you or From my notes.
- Choose a Tone: Formal, Friendly or Playful.
- Add Extra notes if needed, for example "remind them to bring their ID, parking is in basement B2", then click Write.
- Review the Suggested text, edit it if you like, then click Use this text to replace the text block. Not happy with it? Click Rewrite.
The text comes with personalization variables (name, ticket code and so on) that are replaced with each person's details at send time. Each request uses 1 AI credit from your organization; no attendee data is sent to the AI. Studio warns you if the text contains a link outside Tickmi, or wording you should avoid (the word "ticket" on invitation cards, the word "free" in content attendees read).
3. Subject, CC and reusing a design
Open the Settings panel, section Sending details: enter the Email subject (required) and CC (optional), pressing Enter to add each address. The subject can include attendee info, for example {{name}} or {{product_name}}. The same panel also holds the outer background color and the content background of the email.
To reuse a design you like for another program, click Copy on the template in the Email templates list and edit the copy; the original stays unchanged.
Dark mode, link checks and the invitation page link
- Dark mode support (in the template settings, on by default): when the phone is in dark mode, Gmail and Outlook switch the email to a dark background with light text, and the ticket image stays as it is. Turn it off and the email always keeps the light background you designed.
- Buttons and links must start with https://. The input turns red when it does not, and a link that cannot open is disabled in the preview, so you can fix it before sending.
- The Invitation page link element sends each person to their own invitation page with their name on it; the link is filled in automatically at send time. See an invite page for every ticket product.
When you no longer use a template, click Hide template (with a confirmation box): it disappears from the library and from every template picker, while places already using it keep working. The Filter by status box offers Active (default), Hidden or All; open the Hidden filter to click Unhide.
4. Preview before you use it
Click Preview on the top bar to open Email preview: pick a Gmail, Outlook or Apple Mail look, switch device sizes or view the Actual size. The preview also warns you about things that tend to break, for example Outlook may ignore rounded corners and shadows, or the content still has div blocks that can break the layout in desktop Outlook.
5. Assign an email template to a ticket type
- Open the ticket product → Setup → Ticket types, choose a ticket type and switch to the Email tab.
- Turn on Automatically send email when a guest is approved.
- Choose the Email template. The Email subject and CC default to the template's values; you can change them for this ticket type only, and click Use template value to go back.
- Turn on Attach the ticket file to the email if you also want to send a ticket file to download. Tickets in PDF/HTML format are always sent as attachments.
A ticket type without email sending shows the label Email sending off: tickets are still created but attendees do not receive an email. For the full sending flow, see send QR tickets in bulk by email.
6. Send ticket emails from your own domain (SMTP)
By default, tickets are sent from the system's address. Go to Settings → Sending emails.
Change only the sender name
The Tickmi system mail card needs no SMTP: turn on Use organization name as sender name, enter the Sender name and click Save. Emails still go out from Tickmi's verified address; only the display name changes.
Send from your own address
- Click Add configuration.
- In Sender information, enter the Configuration name, From email and Display name. The preview box shows what recipients will see.
- In Mail server (SMTP), enter the SMTP host, Port (587 for STARTTLS, 465 for SSL), SMTP username, SMTP password and choose the Connection security.
- In Test before saving, enter a test recipient email and click Send test.
- Click Create configuration, then Activate.
For Gmail/Outlook you need an app password, not your normal sign-in password. The From email should match the SMTP account. When you change the host, port or username, you must enter the SMTP password again.
An organization can save several configurations but only one can be active at a time (labeled In use). Click Deactivate to go back to the system's default email.
7. Track email history and per-person errors
In the ticket product, History → Email sending lists every email sent to attendees, including the recipient address, the sending email and the delivery status; the View mail button opens exactly what was sent.
In the Tickets tab, the Mail sent column shows each ticket's status; a ticket that failed shows Send failed (n×). The system retries up to 5 times; if it still fails (usually because of a wrong email), fix the attendee's email, select the ticket and click Resend email. Each ticket has a limit on resends; tickets that hit the limit are skipped and Studio tells you how many were skipped. To send tickets over Zalo as well, see send tickets via Zalo ZNS. Learn more about Tickmi's QR invitation tickets.
Frequently asked questions
Does the Write for me button use attendee data?
No. The AI assistant only receives the purpose, tone and notes you type, plus the list of variable names. The text it returns contains personalization variables, which are replaced with each person's details only when the email is sent. Each request uses 1 AI credit from your organization.
Can I send tickets without configuring SMTP?
Yes. When no configuration is active, the system sends tickets from Tickmi's default email address. You can still change the sender name to your organization's name on the Tickmi system mail card.
Can I use Gmail as the sending server?
Yes, but you need to create an app password in your Google account and use that password in the SMTP password field.
How do I show the ticket image directly in the email body?
Add the E-ticket element to the email template. The Attach the ticket file to the email option only decides whether an extra file attachment is sent.
How do I find out which attendees have not received their email?
Check the Mail sent column in the Tickets tab, or History → Email sending. Tickets that failed are marked Send failed and can be resent.
The Tickmi team is here to help on hotline 0349 632 920, or try Tickmi for free and follow along.