
Web check-in and barcode scanners
Besides the app, you can check in right on the Tickmi Studio web app: type a code, use a barcode reader plugged into a computer, or look attendees up by name. This guide also shows how to choose what staff see when they scan.
On this page
1. Open the Check-in tab of your ticket product
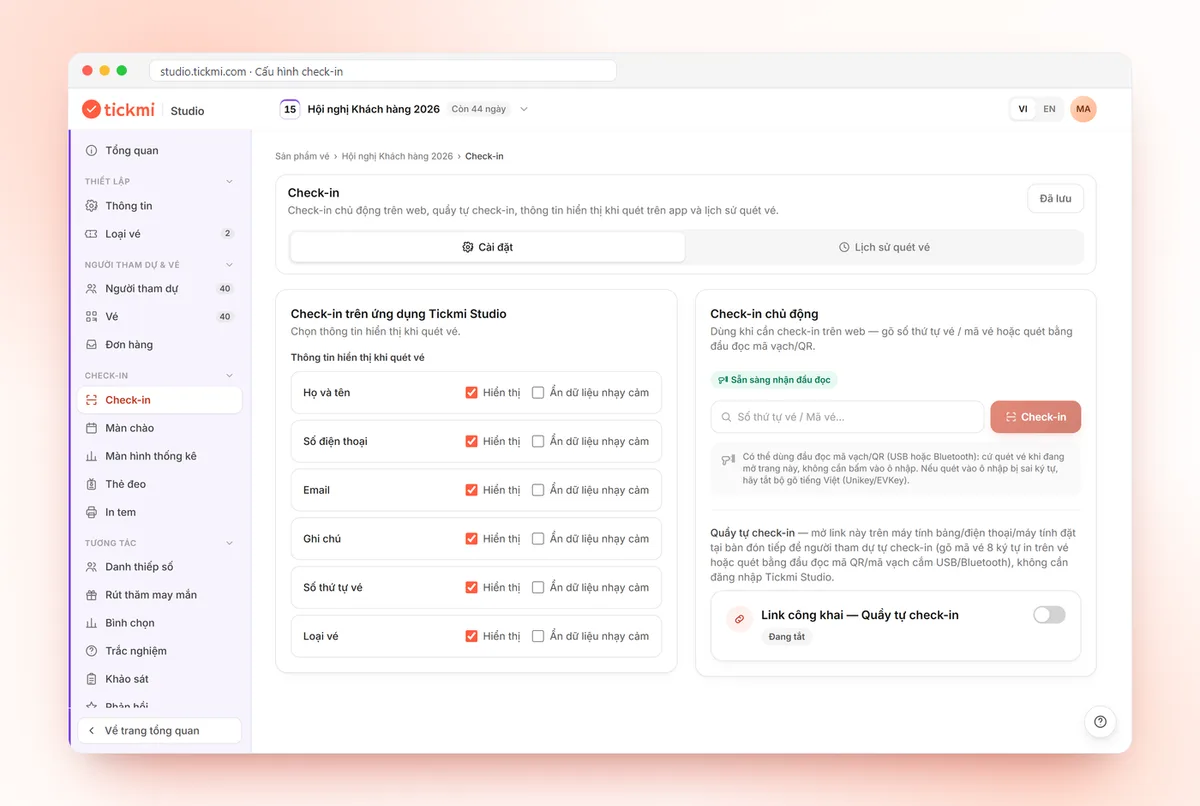
On the Tickmi Studio web app, choose your ticket product and open the Check-in group → Check-in in the left menu. The page has two sub-tabs:
- Settings: on the left are Check-in on the Tickmi Studio app (the information shown when scanning) and Attendee self check-in on the Tickmi Ticket app; on the right is Manual check-in with the Self check-in kiosk link.
- Scan history: every scan from every source, with statistics and filters.
Changes on the Settings tab are saved with the Save changes button at the top of the page; the button turns into Saved when nothing is left unsaved.
2. Choose the information shown when scanning
The Check-in on the Tickmi Studio app section decides what staff see in the Additional information area of the app's result screen.
- In the Information shown when scanning list, tick Display for each field you want staff to see. The list includes full name, phone number, email, note, the custom fields that are turned on, plus Ticket No. and Ticket type.
- For a sensitive field, also turn on Mask sensitive data so the app shows only part of it. This option works for any field, not just phone number or email.
- Click Save changes.
Until you configure it, every field is shown and none is masked. The configuration applies to online scans and also to the offline data that the app downloads after you save. For custom fields created in the attendee list, see Create custom fields.
3. Manual check-in on the web
The Manual check-in section is for a desk with a computer:
- Type the Ticket No. or the Ticket code (8 letters and digits printed on the ticket) into the Ticket No. / Ticket code... box.
- Click Check-in.
- Read the result: Checked in with the attendee's name, Ticket No. and Ticket code; This ticket has already been checked in; or No ticket found with this code.
If the computer loses its connection, the page shows an Offline label, saves the check-ins and syncs them automatically when the network is back; the number of tickets waiting to sync appears right on the page. Do not close the tab while tickets are still waiting.
4. Use a USB or Bluetooth barcode reader
Keyboard-type barcode/QR readers (plugged in by USB or connected by Bluetooth) work right away with no software to install. The reader can read both the QR code and the barcode printed on the ticket.
- Plug the reader into the computer and open the Check-in tab.
- When the page shows Scanner ready, just scan tickets; you do not need to click the input box.
- The result appears just as it does when you type a code. Scans are recorded with the source Studio web · Barcode reader, while typed entries are recorded as Studio web · Manual entry.
Scanning produces wrong characters? Turn off the Vietnamese input method (Unikey/EVKey) on the computer and scan again.
The reader also works with the Self check-in kiosk link so attendees can scan for themselves, see The web self check-in kiosk.
5. Check in by attendee name
When an attendee does not have their ticket, staff can look them up by name:
- Open the Tickets tab of the ticket product and search by name, phone number, email or ticket code.
- Tick the ticket you want to check in.
- Click Mark as checked in and confirm.
If you marked one by mistake, select the ticket again and click Mark as not checked in; the ticket's current check-in status is cleared. In the app, the Attendees tab also has a search box for name, phone number, email and ticket number.
One computer can both receive a reader and run the Auto print station to print a label or badge right after each check-in, see Auto-print at check-in.
Daily check-in limit
Multi-day tickets, exhibitions and courses often need to let attendees in once per day. For ticket types like these, you choose how check-ins are counted right in the ticket type:
- Open your ticket product, go to the Ticket types menu and edit the ticket type you want to change.
- In the Check-ins per ticket field, enter the number of check-ins. The Check-in limit setting has two options:
- Total limit: a ticket can be scanned up to the number you entered across the whole program. Enter 1 if each ticket is for a single entry. This is the default, and existing ticket types stay as they are.
- Daily limit: a ticket can be scanned up to the number you entered each day, and the count starts over the next day. For example, enter 1 and each attendee can enter once per day. Days are counted in Vietnam time, from 00:00 to 23:59.
- Click save. The ticket type card shows scan up to … times or scan up to … times/day so you can double-check.
If the ticket type already has scans and you change the limit type, Studio asks Change the check-in limit? before saving. Existing scans are kept. Switching to daily lets tickets that were scanned before be scanned again from the new day; switching to total counts the scans already made toward the limit, and tickets that have used them all are rejected.
When a ticket has used up its check-ins for the day, the scan screen says the ticket cannot be checked in again; the next morning it scans normally again. Offline scans are counted by the actual scan date, so a scan made yesterday that syncs today still counts for yesterday. For how to read results in the app, see Read the result screen.
6. Follow the scan history
The Scan history tab combines every scan from the app, kiosk, barcode readers and manual check-ins, with a Source column and a Scanned by column. At the top are the Checked in card (tickets that have arrived out of the total, not counting cancelled tickets) and the Successful check-ins by source card with a By scanner list. You can search by name or ticket number / ticket code, filter with the Check-in sources button, click Export data to download a file, and reprint the label, ticket or badge for any row.
| Source | Scans come from |
|---|---|
| Tickmi Studio app / Tickmi Studio app · Offline | Staff scanning with the app, online or offline and synced later. |
| Tickmi Studio app · Kiosk mode | Kiosk mode in the app. |
| Studio web · Manual entry | A code typed into Manual check-in. |
| Studio web · Barcode reader | A reader plugged into the computer that has the Check-in tab open. |
| Self check-in kiosk · Attendee scan / · Barcode reader | Attendees checking themselves in through the kiosk link. |
| Tickmi Ticket app | Attendees checking themselves in with their own app. |
How to filter and read figures by source and by staff member is covered in Check-in stats by scan source and scanner. To show progress on a big screen, see Check-in stats screen. Learn more about Tickmi's check-in software and QR code check-in.
Frequently asked questions
What software do I need for a barcode reader?
None. A keyboard-type reader over USB or Bluetooth works as soon as you open the Check-in tab on the web; just turn off the Vietnamese input method if characters come out wrong.
What does Mask sensitive data do?
A field with Mask sensitive data turned on shows only part of its value on the app's result screen, so staff can confirm the attendee without seeing the full phone number or email.
Can I delete the scan history?
Yes. The Scan history tab has a Delete all history button, or you can tick individual rows and click Delete selected. This cannot be undone, but each ticket's current check-in status stays as it is.
The Tickmi team is here to help on hotline 0349 632 920, or try Tickmi for free and follow along.