
How to send QR tickets in bulk by email in 5 steps
From one Excel file of attendees to each person's inbox: every attendee gets their own QR ticket with a Ticket code, ready for check-in. This guide walks through all 5 steps in Tickmi Studio and the problems people hit most often.
On this page
- Before you send
- Step 1: Create a ticket product
- Step 2: Choose the ticket and email templates
- Step 3: Import the list from Excel
- Send a test to yourself first
- Step 4: Approve to issue and send tickets in bulk
- Send in batches instead of all at once
- Track email delivery
- Fix a broken email and resend
- Change details after sending
- Step 5: Check in with QR at the gate
- Common problems when sending in bulk
Sending invitation tickets to a few hundred attendees by writing each email yourself takes a long time and is easy to get wrong. With Tickmi you import the list once and approve once: the system creates a separate QR ticket for each person, builds the ticket file from your template and sends the email automatically.
Before you send
- An Excel file with your attendee list. The two required columns are Full name and Ticket type; to send email you also need an Email column. You can add phone number, note, quantity and custom fields such as company, job title or table number.
- A Tickmi Studio account with enough ticket issuance quota (or event package) for the number of tickets you plan to send.
- A logo or brand image if you want the tickets and emails to carry your own branding.
Step 1: Create a ticket product
In Tickmi Studio, go to Ticket products → Create new, choose the type of ticket product, enter the name, description, venue and the Starts/Ends times, choose What is this? and click Create ticket product. Keep the Quick setup (recommended) option so Tickmi creates a "General admission" ticket type with a ticket template and an email template from the template library.
If you need several ticket classes (VIP, Guest, Press and so on), go to Setup → Ticket types → Add ticket type. Each ticket type has its own ticket template, number of tickets, number of check-ins per ticket and delivery settings. See also get started with Tickmi Studio.
Step 2: Choose the ticket and email templates
- Open each ticket type. On the General tab, choose the Ticket template and the Issued ticket file format (Image, PDF or HTML). To change the look, see ticket design and the template library.
- Switch to the Email tab, turn on Automatically send email when a guest is approved, choose the Email template, adjust the Email subject and CC, and turn on Attach the ticket file to the email if needed.
- Click Save. The ticket type card now shows the Auto-send mail label.
The email template should include the E-ticket element (the ticket image inside the email), a Ticket button (opens the personal ticket page) and a Ticket code line. Details are in designing ticket emails.
Tip: set up the Ticket sending email with your organization's email address, or at least change the sender name to your organization's name, so recipients recognize the message right away.
Step 3: Import the list from Excel
- Go to Attendees & tickets → Attendees → Import guests.
- Click Download template and copy your data into the right columns; in the Ticket type column, use exactly the name of a ticket type you created.
- Click Choose Excel file. Each import takes up to 10,000 rows; rows with errors come back in Download error file to fix and re-import so you can correct them.
You can also import the list from a publicly shared Google Sheet. For details, see importing attendees from Excel.
Send a test to yourself first
Before you approve the whole list, add yourself (and a colleague who uses a different mailbox, for example Gmail and Outlook) as attendees of that ticket type, then approve just those rows. Open the email on a phone and on a computer and check:
- Whether the sender name and the Email subject are easy to recognize.
- Whether the ticket image shows the right name and ticket type, the QR code is clear and the Ticket button opens the personal ticket page.
- Whether the email lands in the main inbox or in the promotions or spam folder.
A test ticket is a real ticket, so it uses one ticket issuance quota. If you no longer need it, delete the test attendees before the event date.
Step 4: Approve to issue and send tickets in bulk
Newly imported people are in the Pending approval status and have no ticket yet. This is your last checkpoint before sending.
- Review the list and fix any wrong emails.
- Click Approve all (number of people) at the top of the page, or select a group and click Approve selected.
- Each ticket is issued with a ticket number, an 8-character Ticket code and a unique QR code. The system generates the QR code, builds the ticket file from the template and then sends the email.
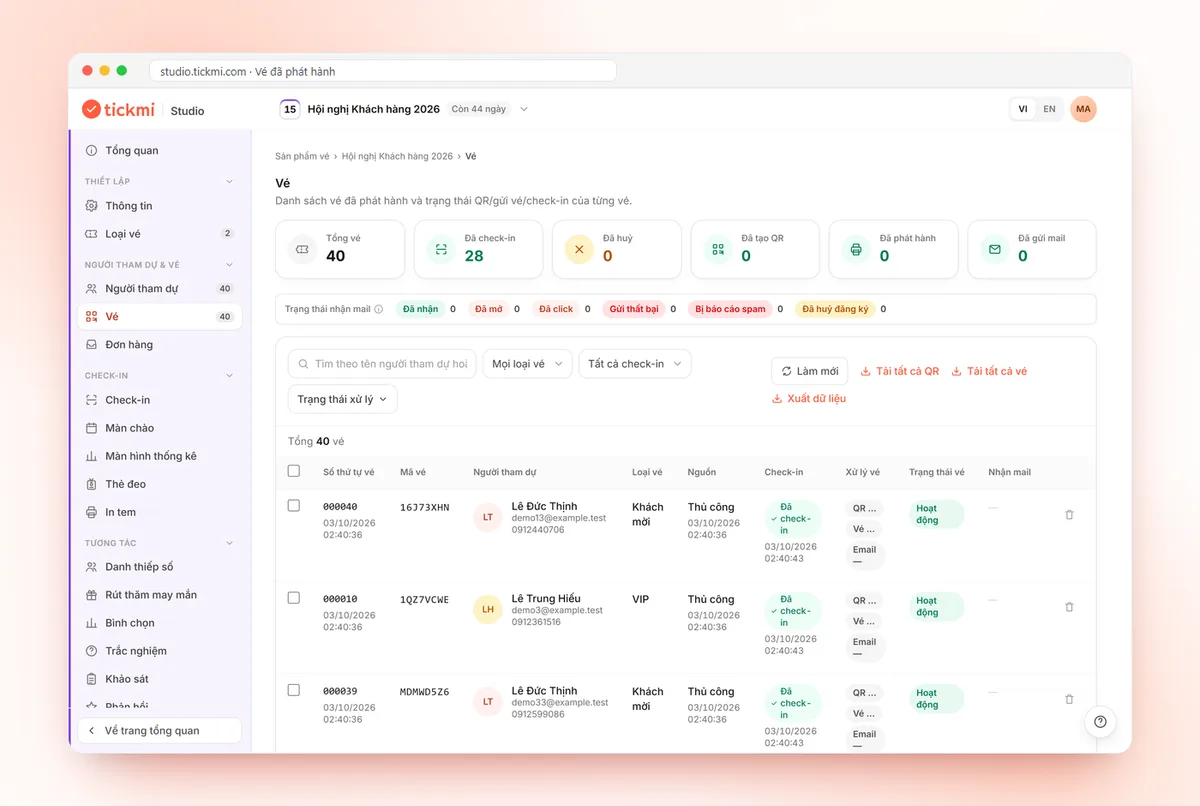
- Open the Tickets tab to follow progress: the stat cards QR generated, Issued and Mail sent, and the Mail column for each ticket.
If the Approval result box says Attendees have not received an email, the ticket type has email sending turned off: turn it back on in the Email tab, then select the tickets in the Tickets tab and click Resend email. To also reach attendees through Zalo (a popular messaging app in Vietnam), see sending tickets via Zalo ZNS.
Send in batches instead of all at once
You do not have to send the whole list at the same time. Filter by ticket type or search by name, select the group you want to send to and click Approve selected. This works well when:
- VIP guests and speakers need their tickets first and the general audience gets theirs later.
- The list is still being finalized unit by unit: send to each unit as soon as it is ready.
- You want to send the first few dozen tickets, check the delivery status, and only then send the rest.
Track email delivery
On the Tickets tab, the Mail delivery status strip counts tickets by the status the mail system reports back. Click a status to filter the list:
| Status | Meaning | What to do |
|---|---|---|
| Delivered | The recipient's mail server accepted the message. | Nothing to do. |
| Awaiting result | Sent, waiting for the mail server to report the result. | Wait a few minutes, then click Refresh. |
| Not sent | No email has been sent for this ticket yet. | Check that the ticket type has email sending turned on, then Resend email. |
| Send failed | The send attempt hit an error. | Check the email, then click Resend email. |
| Fix email | The email does not exist, was mistyped or the mailbox is full. | Fix the email (see below). |
| No email | The attendee has no email address. | Send the ticket page link through Zalo or a message, or add an email. |
Each ticket has only one status, so the numbers add up to the total number of tickets that are sent by email.
Fix a broken email and resend
When some tickets cannot reach their recipient, the Tickets tab shows the notice … tickets have a broken email — the attendee has not received the ticket. Click it to filter those tickets, choose Fix email for each person and enter the correct email: the ticket is sent again to the new address. For the full steps, see fixing bounced emails.
Change details after sending
- Change the time or venue for everyone: edit the ticket product information, then let attendees know with Send updates.
- Fix the name printed on one person's ticket: edit the attendee, then select the ticket and click Re-issue tickets to rebuild the ticket file, and then Resend email. Re-issuing a ticket also uses ticket issuance quota; the ticket's QR code stays the same.
- Change the ticket template after sending: only re-issued tickets carry the new template.
Step 5: Check in with QR at the gate
On the event day, staff open the Tickmi Studio app on their phones to scan tickets, and scanning still works when the network is down. Attendees do not need to install an app: they just open the email or the ticket page. A busy gate can also use a barcode scanner or the self check-in kiosk, where attendees type their Ticket code if the QR code cannot be scanned. See also checking in with the Tickmi Studio app.
Common problems when sending in bulk
| Problem | How to fix it |
|---|---|
| Imported, but nobody received a ticket | Attendees are still Pending approval. Click Approve all. |
| Approving says the ticket type has only a few spots left | Increase the Number of tickets of the ticket type on the General tab, then approve again. |
| A ticket shows Failed | Usually a wrong email. The system retries up to 5 times by itself; fix the email, then click Resend email. |
| Duplicate attendees | Remove duplicate emails from the Excel file before importing; when you re-import the error file, delete the rows that were already imported successfully. |
| The email goes to spam | Send from your organization's email, use a clear subject line and avoid writing in all capitals. |
| An attendee lost their email | Resend the ticket in the Tickets tab, or look them up at the gate by name or Ticket code. |
Learn more about Tickmi's QR invitation tickets and QR code check-in.
Frequently asked questions
Can I send a test ticket email before sending the whole list?
Yes. Add yourself as an attendee of that ticket type and approve just that row to receive exactly the email attendees will get. A test ticket uses one ticket issuance quota.
How do I know whether an attendee received their ticket?
Check the Mail delivery status strip on the Tickets tab: Delivered, Awaiting result, Not sent, Send failed, Fix email, No email. Click a status to filter the ticket list.
Is there a limit on bulk QR ticket sending in Tickmi?
Each Excel import takes up to 10,000 rows, and you can import as many times as you need. Each issued ticket uses one ticket issuance quota (or the allowance of an event package).
Why were no emails sent after I imported my Excel file?
Attendees imported from a file are in the Pending approval status. Tickets are issued and emailed only after you click Approve all or Approve selected.
Do attendees need to install an app to receive tickets?
No. The QR ticket arrives by email and can be scanned from a phone screen or a printout.
Can I send tickets from my own company email?
Yes. Set up your organization's Ticket sending email (SMTP) in Tickmi Studio; until you do, the system sends from Tickmi's default email address.
The Tickmi team is here to help on hotline 0349 632 920, or try Tickmi for free and follow along.