
Manage attendees in Tickmi Studio
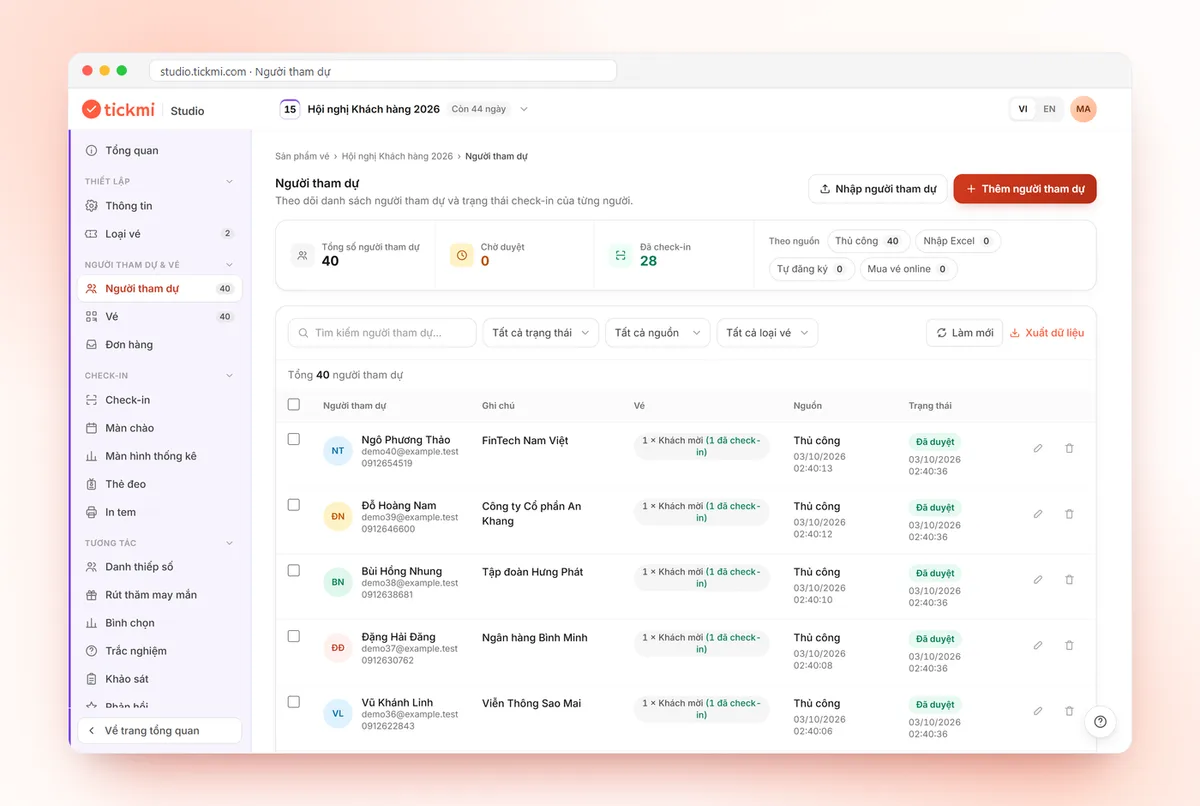
The Attendees section is where you build your list, approve people to issue tickets and track each person's check-in status. This guide walks through the most common tasks, following the current Tickmi Studio interface.
On this page
- Before you start
- Add attendees manually
- Import attendees from Excel with the template
- When your file differs from the template: match columns
- Import from Google Sheets
- Import attendee photos with a zip file
- Search and filter the list
- Data assistant
- Create custom fields
- Approve attendees
- Export data and bulk delete
- After you have your list
Before you start
Each attendee holds tickets of one or more ticket types, so the ticket product needs at least one ticket type. If there is none, the page shows No ticket types yet. Please create a ticket type before adding guests. and the add button is locked. See get started with Tickmi Studio to create your first ticket product and ticket type.
Open the ticket product and, in the left menu, choose Attendees & tickets → Attendees. At the top there is a stats strip: Total guests, Pending approval, Checked in and a By source group (Manual, Excel import, Self-registration, Online purchase). Click a source to filter quickly, and click it again to clear the filter.
Add attendees manually
- Click Add guest.
- Fill in Full name (required), Email, Phone number, Note and any custom fields turned on for the ticket product. An Image-type field lets you upload a photo right away.
- Under Tickets, choose the ticket type and quantity. Click + Add ticket line if this person needs tickets of several different types.
- Click Save. The new attendee is in Pending status.
Tickets are only issued when you approve (see Approve attendees). This lets you review the list before using ticket issuance quota and before ticket emails go out. When you edit someone who already has tickets, the dialog shows a Held tickets section and a Manage tickets shortcut to the Tickets tab.
Import attendees from Excel with the template
For large lists, import from a file instead of typing by hand:
- Click Import guests to open the Import guests from Excel dialog.
- Click Download template. The template already has columns for Full name, Email, Phone number, Note, Ticket type, Quantity and the ticket product's custom fields.
- Fill in one row per person. The two required columns are Full name and Ticket type (use the exact ticket type name); an empty Quantity counts as 1.
- Click Choose Excel file to upload. Each import takes up to 10,000 rows.
- Check the Guest import result box: the system reports how many people were imported. These people are also in Pending status.
If some rows have errors (missing ticket type, a ticket type name that doesn't match, an invalid quantity...), click Download rows with errors. This file is a copy of the file you uploaded, with an extra Error column stating the reason on each failed row.
The error file keeps the rows that were imported successfully too. Before importing again, delete the rows with nothing in the Error column and keep only the rows you fixed, so you don't create duplicate attendees.
When your file differs from the template: match columns
Files exported from Google Forms, other software or sent by partners often use different column names than the template ("Guest name", "Mobile"...). You don't need to edit the file: when it lacks a required column or has unknown columns, Studio opens a Match the columns in your file step before importing.
- Each row is a Column in file with a sample value; next to it is the Tickmi field that will receive that column's data.
- The AI assistant has pre-selected fields for the columns it recognizes, marked with an AI suggestion label. The AI only looks at column names and data types and doesn't send attendee information.
- Check each row. Set columns you don't need to Don't import. Studio warns you if a required column is still missing or one field is chosen for several columns.
- Click Import … attendees to import as usual.
Each AI suggestion uses 1 AI credit from your organization. When the AI is busy or your organization has run out of AI credits, this step still opens so you can pick the field for each column yourself. A file that matches the template's columns is imported directly, without this step.
Import from Google Sheets
In the same dialog, the or import from Google Sheet section lets you paste a Google Sheet link and click Import from Google Sheet. The sheet must be shared as "Anyone with the link" and use the same column structure as the template.
Import attendee photos with a zip file
When the ticket product has an Image-type field (for example a portrait for printing badges), the Import images (zip) button appears. In Excel, fill the photo file name into the photo column; after importing the list, compress all the photos into one zip file with file names matching what you entered, then click Choose zip file. The dialog shows Uploading and Matching and saving images progress in percent, with a Cancel button. The result tells you how many images matched and how many didn't. Images are resized automatically when saved.
Search and filter the list
- Type in the Search by name, phone, email or other info... box.
- Filter by status with the All statuses box: Approved or Pending.
- Filter by source with the All sources box and by ticket type with the All ticket types box.
- Filter by time: Any time, Today, Last 7 days, Last 30 days or Custom date range....
Data assistant
Above the filters there is a ✨ Data assistant box. Type what you want done in plain language, for example "how many people use outlook" or "add a VIP note to self-registered people who haven't checked in", then click Send. The assistant filters and tells you how many people match, builds a stats table, exports to Excel, or prepares data and note changes for you to preview before applying. Approving, sending tickets and deleting are still done in the list. Under the input there is also a Suggestions: line pointing out people with no email to receive tickets, emails that can't receive mail, duplicates, emails and phone numbers to check, people pending for over 3 days and names to tidy. See the Data assistant guide for details.
Each active filter appears as a label with a ✕ to remove it individually; click Clear filter to see the whole list again. The Refresh button reloads the latest numbers.
Create custom fields
Beyond the basics, you can collect your own data such as company, job title or customer tier. Go to Setup → Information → the Guest fields tab.
- Click Create new field and enter a Field name (for example: Company).
- Choose a Data type: Free text, Select list (enter the options separated by commas) or Image.
- For text, What will registrants type? lets you choose Any text, Digits only, Phone number or Email, set the Length (Any, Exactly, Between), use quick presets like Last 4 digits of phone or ID number (12 digits), and type in the Try it box to test.
- Click Save. The new field sits in the Available in the organization group; click Enable to move it up to the Currently used for this ticket product group.
Fields are shared across the whole organization: editing or deleting a field affects every ticket product that uses it. Each ticket product turns on or off the fields it needs. An enabled field automatically appears in the add attendee form, the Excel template, registration forms and the list of auto-filled information when you design tickets.
Approve attendees
People added by hand, imported from a file, or self-registered through a ticket type without auto-approval are all in Pending status. The ticket product menu shows the number waiting so you don't miss anyone.
- Approve one person: click the Approve this guest button on that row.
- Approve several people: tick them and click Approve selected.
- Approve everyone: click Approve all (count) at the top of the page and confirm.
When you approve, the system issues the tickets (each with its own Ticket No., an 8-character ticket code and a QR code) and uses the matching ticket issuance quota. If a ticket type is sold out, approval is blocked with a message showing the remaining capacity. The Approval result box shows how many people were approved; if a ticket type has email sending turned off, the box reports Attendees have not received an email and offers a Go to Ticket types button. See also approving registrations and sending QR tickets in bulk by email.
Export data and bulk delete
Click Export data at the right of the filter bar to download an Excel file of attendees matching the current filters, including ticket type, quantity, check-in status, source and creation date. Because this is personal data, only the organization's Owner and Admin can export.
To delete many people at once, select them and click Delete selected. When you delete a person, their tickets are removed too. The system always asks for confirmation first because this can't be undone.
After you have your list
The attendee list feeds every later step: download and print tickets in bulk, attendance confirmation, check-in with the app, print labels and badges. Learn more about Tickmi's QR invitation tickets.
Frequently asked questions
Can I import an Excel file whose column names differ from the template?
Yes. Studio opens the Match the columns in your file step, and the AI assistant pre-selects Tickmi fields for the columns it recognizes (AI suggestion label). Check them, set extra columns to Don't import, then click Import. If you're out of AI credits, you pick the field for each column yourself.
I added an attendee, so why don't they have a ticket yet?
People added by hand or imported from a file are in Pending status. Click Approve this guest, Approve selected or Approve all to issue tickets; the tickets are then created and emailed if the ticket type has email sending on.
A few rows failed during the Excel import. What do I do?
The valid rows are still imported. Click Download rows with errors to get the file back with an extra Error column. Delete the rows that were imported successfully, fix the failed ones and import again to avoid duplicates.
Do custom fields apply to every ticket product?
Fields are created at the organization level and shared, but each ticket product turns on or off the fields it needs in the Guest fields tab.
Can check-in staff export the attendee list?
No. Export data is only available to the organization's Owner and Admin.
The Tickmi team is here to help on hotline 0349 632 920, or try Tickmi for free and follow along.