
Sell tickets online with Tickmi
Turn on sales for each ticket type in Tickmi Studio so buyers can order and pay on ticket.tickmi.com and get a QR ticket by email right after payment. This guide covers ticket type setup, the ticket sales settings of your ticket product, and what buyers see.
On this page
1. Turn on sales for a ticket type
Each ticket type goes on sale separately. One ticket product can have a ticket type sold online, an invitation ticket type and a free registration ticket type side by side.
- Open your ticket product → Setup → Ticket types, then pick an existing ticket type or click Add ticket type.
- On the General tab, check the Ticket type name, Ticket template and Number of tickets. The number of tickets is the maximum for this ticket type and includes both tickets sold online and tickets you issue yourself.
- Switch to the Sales tab and turn on Enable ticket sales.
- Enter the Price (VND), Maximum per order, Sale starts and Sale ends.
- Click Save. If anything is missing, Tickmi Studio tells you which field is missing and on which tab.
About ticket prices:
- Enter 0 for a free ticket. Attendees still claim tickets on the sales page but do not pay; each free ticket uses 1 ticket issuance quota of your organization.
- A paid ticket must meet the minimum price (shown right below the Price (VND) field). Paid tickets only incur the platform fee and do not use any ticket issuance quota.
To have each ticket delivered to each attendee right after payment, open the Email tab, turn on Automatically send email when a guest is approved and choose an Email template. If it is off, buyers still receive an order confirmation email and can view their tickets on the order page. See also ticket design and the template library.
2. Ticket sales settings for your ticket product
Go to Setup → Information → the Ticket sales sub-tab. This tab is visible only to the organization owner and administrators. The setting groups are:
- Sales channel: the Ticket page link (click Copy to share it) and the List publicly on Tickmi switch.
- Collect attendee info at checkout: when on, the buyer enters a full name and email (phone number optional) for each ticket; every ticket belongs to a separate attendee and is sent to that person's email. When off, the buyer is the attendee of every ticket in the order and all tickets go to the buyer's email.
- Platform fee & who pays it: the fee currently applied to your organization is shown here with an example for one ticket. Choose Organizer pays the fee (the buyer pays exactly the ticket price and the fee is deducted from what you receive) or Buyer pays the fee (the fee appears as a "Service fee" line at checkout and you receive the full ticket price). A change applies to new orders only.
- Virtual queue: see section 3.
- Q&A assistant for buyers: see the section below.
When you are done, click Save settings in the bar at the top. If you change your mind, click Discard. Free tickets carry no platform fee and only use ticket issuance quota.
Q&A assistant for buyers
Buyers tend to ask the same few questions: what time do doors open, is there parking, do children need a ticket. Turn on the Q&A assistant for buyers switch and the ticket page gets an Ask the organizer box where an AI assistant answers instantly on your behalf.
- Turn on the Q&A assistant for buyers switch.
- In Extra info for the assistant, add anything that is not in your product description: door times, parking, rules for children, what to bring and so on (up to 4,000 characters).
- Click Save settings, then open the ticket page and try a few questions.
The assistant answers only from the product information and this extra info. It cannot see the buyer list or any other data. When it has no information for a question, it invites the buyer to contact you. Every 10 answers use 1 AI credit of your organization.
The assistant runs only when your organization has bought a plan or service. If not, Studio shows a reminder with a See packages link; see Plans and ticket issuance quota.
3. Virtual queue for high-demand sales
The Virtual queue section controls how many people can check out at the same time. It has three modes:
| Mode | How it works |
|---|---|
| Off | No queue; everyone who arrives can buy right away. Suitable for moderate demand. |
| Automatic (recommended) | A queue forms only when the number of people checking out at the same time reaches the limit. |
| Always queue | Everyone goes through the queue; people who enter the waiting room before sales open are given a random order by lottery when sales start. |
For the modes with a queue, set People checking out at once and Admission rate (people/min), each between 10 and 100,000, then click Save settings. Buyers see their position, the number of people ahead of them and an estimated wait, without reloading the page. When it is their turn they have 15 minutes to complete the order; staying away from the page too long can cost them their turn.
4. Buyers order, hold and pay
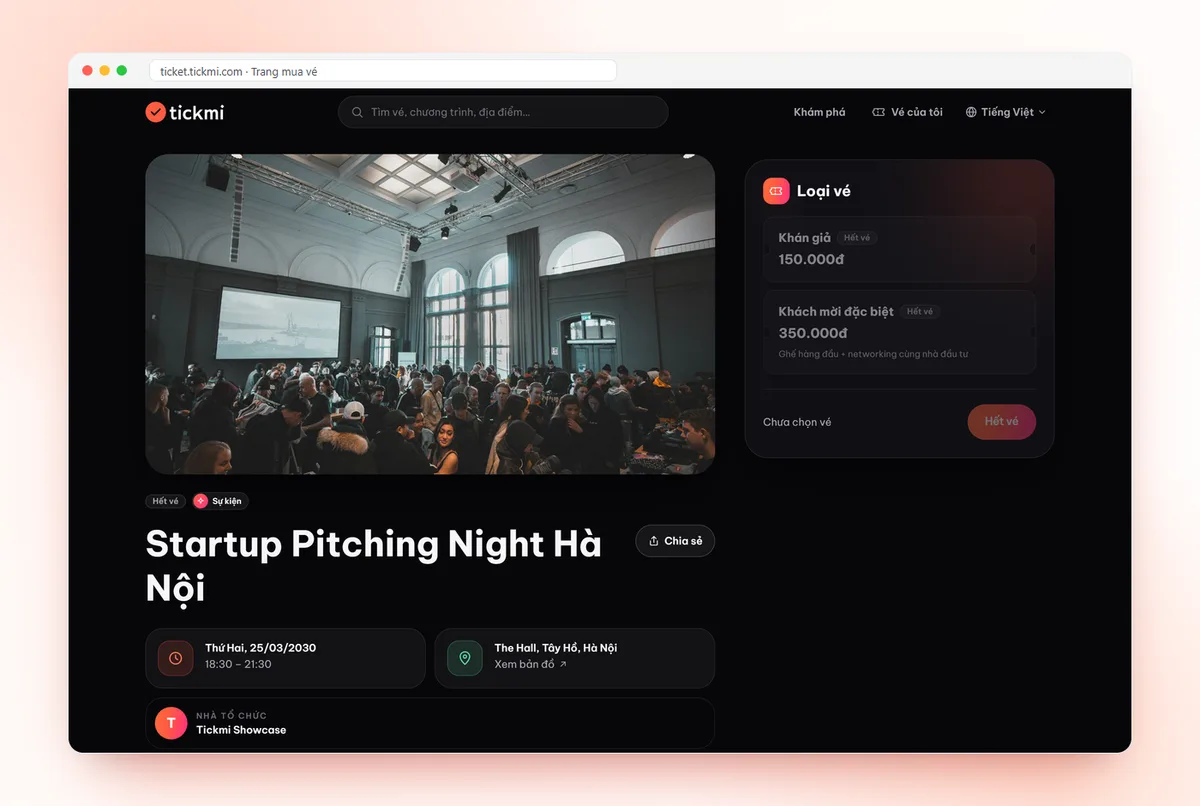
- The buyer opens your ticket page link on ticket.tickmi.com, chooses a ticket type and quantity, and clicks Get tickets (or Enter waiting room when a queue is on).
- They fill in the Buyer details (full name, email, phone number) and the details of each attendee if you turned that option on.
- They review the order and click Pay. The tickets are held for the buyer for 10 minutes; the screen shows the Hold time left.
- They pay through VNPay (domestic ATM cards, Visa/Mastercard, bank QR). VNPay is a popular Vietnamese payment gateway.
- After a successful payment, the e-ticket appears right away on the order page and is sent by email.
For free tickets the buyer just clicks Get tickets. If the hold time runs out, the order expires and the tickets go back on sale. A detailed guide for buyers is in buying tickets on ticket.tickmi.com.
5. My tickets and sign-in with a verification code
Buyers do not need to create an account. In My tickets on ticket.tickmi.com they enter the email they used to buy, click Send code, enter the 6-digit verification code they receive by email and click Verify to see all their tickets, split into Upcoming and Past. Tickets you invited or issued to the same email also appear here with the Invited ticket label. Each ticket also opens as a personal ticket page.
6. List your product publicly on the ticket site
By default only people with your link can buy. Turn on List publicly on Tickmi to make your ticket product appear on the home page and in search results of ticket.tickmi.com. The switch can be turned on only when the ticket product has a cover image, a long enough description, an event date that has not ended, at least one paid ticket type sold online, and your organization has registered a payout account (see set up your payout account). The first time you turn it on, if your organization has not yet accepted the current version of the Ticket Sales Policy for Organizers and the Operating Rules, Studio asks you to accept them before saving.
After you turn it on, Tickmi reviews the listing before it appears (status Waiting for Tickmi review); organizations that are approved automatically are listed right away. For the conditions, review statuses and how to fix a rejection, see listing your ticket product on ticket.tickmi.com.
Orders are managed under Attendees & tickets → Orders; summary figures are in the Revenue menu. When buyers arrive at the gate, check them in with the app like any other ticket. Learn more about selling tickets online with Tickmi.
Frequently asked questions
How much does selling tickets online cost?
The fee currently applied to your organization is shown in the Platform fee & who pays it section of the Ticket sales tab, with an example for one ticket. Free tickets carry no platform fee and only use ticket issuance quota.
Do buyers have to create an account?
No. Buyers can see their tickets again in My tickets by entering their email and the 6-digit verification code sent to it.
Can I sell tickets without listing them publicly?
Yes. When public listing is off, only people with your ticket page link can buy, which suits testing or selling to a private group. Selling through the link does not need Tickmi's review.
Do tickets sold online use ticket issuance quota?
Paid tickets do not use ticket issuance quota, only the platform fee. For free tickets claimed on the ticket page, each ticket uses 1 ticket issuance quota of your organization.
The Tickmi team is here to help on hotline 0349 632 920, or try Tickmi for free and follow along.