
Get started with Tickmi Studio
It takes just a few minutes to go from creating an account to having your first ticket type ready to issue. This guide walks through each step and introduces the menu of a ticket product.
On this page
Step 1: Sign up for Tickmi Studio
A new account comes with a free ticket issuance quota of 100, no payment card needed, enough to try the whole flow from registration and ticket issuing to sending tickets and check-in. The sign-up wizard has 4 steps: Account → Verify → Workspace → Done.
- On the Tickmi Studio sign-in page, click Sign up now.
- At the Account step, fill in Full name, Username, Email, Phone (optional) and Password (at least 8 characters), tick the box to agree to the Terms of Use and Privacy Policy, then click Sign up.
- At the Verify step, enter the 6-digit code sent to your email and click Verify. The code is valid for about 10 minutes; if you have not received it or it has expired, click Resend code.
For details on signing in, forgotten passwords and signing out, see account, sign-in and devices.
Step 2: Set up your first organization
An organization is the shared workspace for all your ticket products, members and plans. Each account can create one organization. Right after you verify your email, you move to the Workspace step:
- Enter the Organization / company name.
- Choose your Primary use case (Events / conferences, Invitations / internal use, Attractions / services, Transportation or Other) and your Expected monthly volume.
- Under What would you like to do first?, choose Create a ticket product myself to go straight into setup, or Ask Tickmi to set it up if you want the Tickmi team to help with rollout.
- Click Finish setup. The Your Tickmi account is ready screen shows the next steps and a Create first ticket product → button (or Contact sales if you asked Tickmi to set it up).
Later you can edit the organization name and logo under Organization & members → the Info tab. It also shows your organization's Public URL (view only) and an optional Organization profile block: You are, Industry, Organization size and Products you usually make (preselected when you create a new ticket product). To work with colleagues, see the guide to members and permissions.
Step 3: Create your first ticket product
A ticket product holds all the ticket types, attendees, issued tickets and check-in data of one program.
- Go to Ticket products in the main menu and click Create new (or New ticket product on the overview page, or use the ticket product switcher in the top bar).
- Choose the type of ticket product you want to create. Types marked Coming soon cannot be used yet.
- Already have an intro text (a Facebook post, a message to partners…)? Click the ✨ Quick fill from a description line, paste the text into Describe your program and click Fill it in. The AI assistant pre-fills the name, time, location, organizer, description and the What is this? field; if your text mentions several ticket classes, those ticket types are created at the same time when Quick setup is on (prices are set later under Ticket sales). It uses 1 AI credit. Any field the AI cannot read stays as it is, so review every field before you click create.
- Under What is this?, pick a matching category (required, can be changed later). This helps Tickmi suggest suitable templates and figures.
- Fill in the name, Description, Location, Starts and Ends times, Organizer (defaults to your organization name) and upload a Banner / cover image if you have one (recommended 1920 × 1080 px, under 2 MB; keep text and logos in the middle area because the image is cropped to a vertical frame and a wide frame on the ticket sales page).
- Keep Quick setup (recommended) on so the system creates a "General admission" ticket type with a ready-made ticket design and email from the template library.
- Click Create ticket product. You go straight to the overview page of the ticket product you just created.
A new ticket product is Visible. If you do not want it to appear on the ticket sales page and the public registration page, you can hide it; a Hidden ticket product can still check in and send tickets.
Step 4: Create ticket types for each way of issuing
A ticket product can have several ticket types, and each ticket type chooses how it reaches attendees. Go to Setup → Ticket types → Add ticket type. The ticket type form has these tabs:
- General: Ticket type name, Ticket template (pick from the library or design your own), Issued ticket file format (Image, PDF or HTML), Number of tickets, Check-ins per ticket (enter 1 if the ticket is scanned only once, higher for multi-day tickets or tickets that allow several entries). The Check-in limit field lets you choose Total limit (the count applies to the whole program) or Daily limit (it resets each day; see Daily check-in limit).
- Registration: turn on Allow registration so attendees can register themselves for free tickets through the public registration page; choose Automatically approve registrations, Maximum tickets per registration, and the Registration opens / Registration closes times.
- Sales: turn on Enable ticket sales, enter Price (VND), Maximum per order and the Sale starts / Sale ends times to sell tickets online.
- Email: choose an Email template and turn on automatic email when tickets are issued, with the ticket file attached if you like.
- Zalo: send tickets via Zalo (a popular Vietnamese messaging app) to the attendee's phone number, independently of email.
This means that in one ticket product you can mix three kinds of tickets:
| Ticket kind | How to set up | Attendees get their ticket when |
|---|---|---|
| Invitation by list | Only the General tab is needed, then add or import attendees | The organizer adds them to the list |
| Registration ticket | Turn on the Registration tab | Their registration is approved (automatically or manually) |
| Paid ticket | Turn on the Sales tab | Payment succeeds |
Each ticket issued for an invitation, a registration or a free sale (price set to 0) uses one ticket issuance quota; paid tickets only incur a platform fee. See how it works in when ticket issuance quota is deducted.
Details for each kind: manage attendees, create a registration page and sell tickets online. For ticket templates, see ticket design and template library.
Step 5: Get to know the ticket product menu
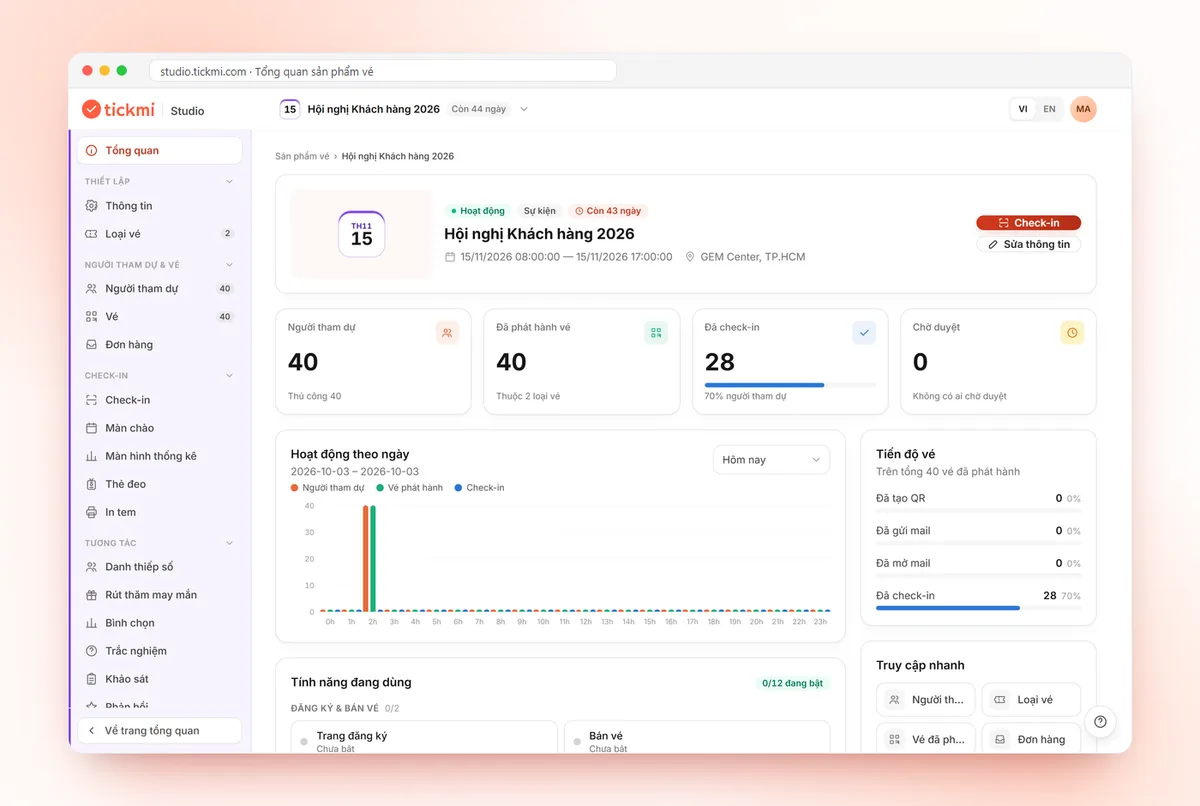
When you open a ticket product, the left menu switches to that ticket product's own menu. You can switch quickly between ticket products with the selector in the top bar, and you stay on the same section. It is best to work in the order Setup → Attendees & tickets → Check-in.
- Overview: the main figures of the ticket product, and the way into the Summary report.
- Setup: Information (General, Agenda, Guest fields, Registration page, Ticket sales) and Ticket types.
- Attendees & tickets: Attendees, Tickets (QR status, delivery and check-in of each ticket), Orders and Send updates (the last two are visible only to the Owner and Admin).
- Check-in: Check-in, Welcome screen, Live stats screen, Badges, Print tags.
- Interaction: Digital cards, Lucky draw, Wishes (shown on a big screen), Voting, Quiz, Survey, Feedback.
- History: Attendee creation, QR generation, Email sending, Zalo sending, Ticket issuance and Ticket view on registration.
Depending on your account setup, some items in the Check-in and Interaction groups may not be shown.
Next steps
When your organization has no ticket products yet, the overview opens with the What are you organizing? screen. Describe your program in one sentence (or pick a suggestion such as Company year-end party, Seminar with registration or Paid workshop) and click Create draft: Tickmi prepares the registration page, ticket template and check-in setup for you to review and edit before saving. Each draft uses 1 AI credit, and the credits left appear right under the button. If you do not want to use AI, click Set up from scratch.
The overview has a Get started with Tickmi panel listing 5 steps: create a ticket product, create ticket types, add attendees, send QR tickets and check in with the Tickmi Studio app. You can click Take a quick tour to replay the intro tour, or Hide guide once you are comfortable. The top right of the overview shows your plan and the remaining ticket issuance quota; see plans and ticket issuance quota.
If you have a question while working, open Studio's help panel and click Chat with Tickmi. The AI assistant answers first, with links to related guides; click Helpful or Not helpful under an answer so Tickmi can improve. To talk to a person, click Talk to a Tickmi person; the support team replies right in the chat, usually within minutes during business hours. If you pick a template on the ticket templates page on tickmi.com and click Use this template, Studio opens that exact template after you sign in or sign up.
Continue with sending QR tickets in bulk by email and checking in with the Tickmi Studio app, or learn more about Tickmi's check-in software.
Frequently asked questions
Does a new account cost anything?
No. A new account comes with a free ticket issuance quota of 100 and needs no payment card. When you need more, buy it under Organization & members: the Ticket credits tab (quota shared by all ticket products) or the Event package tab (a dedicated allowance for one ticket product that does not sell tickets).
Can one ticket product have both invitation tickets and paid tickets?
Yes. Each ticket type turns on Registration or Sales by itself, so you can put invitation tickets, registration tickets and paid tickets in the same ticket product.
Do I have to create a ticket type before adding attendees?
Yes. Each attendee is linked to a ticket type, so you need at least one. Turning on Quick setup when you create the ticket product creates a "General admission" type for you.
What is the "What is this?" field for when creating a ticket product?
It is the category of the ticket product, and you must pick one. Tickmi uses it to suggest suitable templates and figures. You can change it later under Setup → Information.
The Tickmi team is here to help on hotline 0349 632 920, or try Tickmi for free and follow along.