
The live check-in stats screen
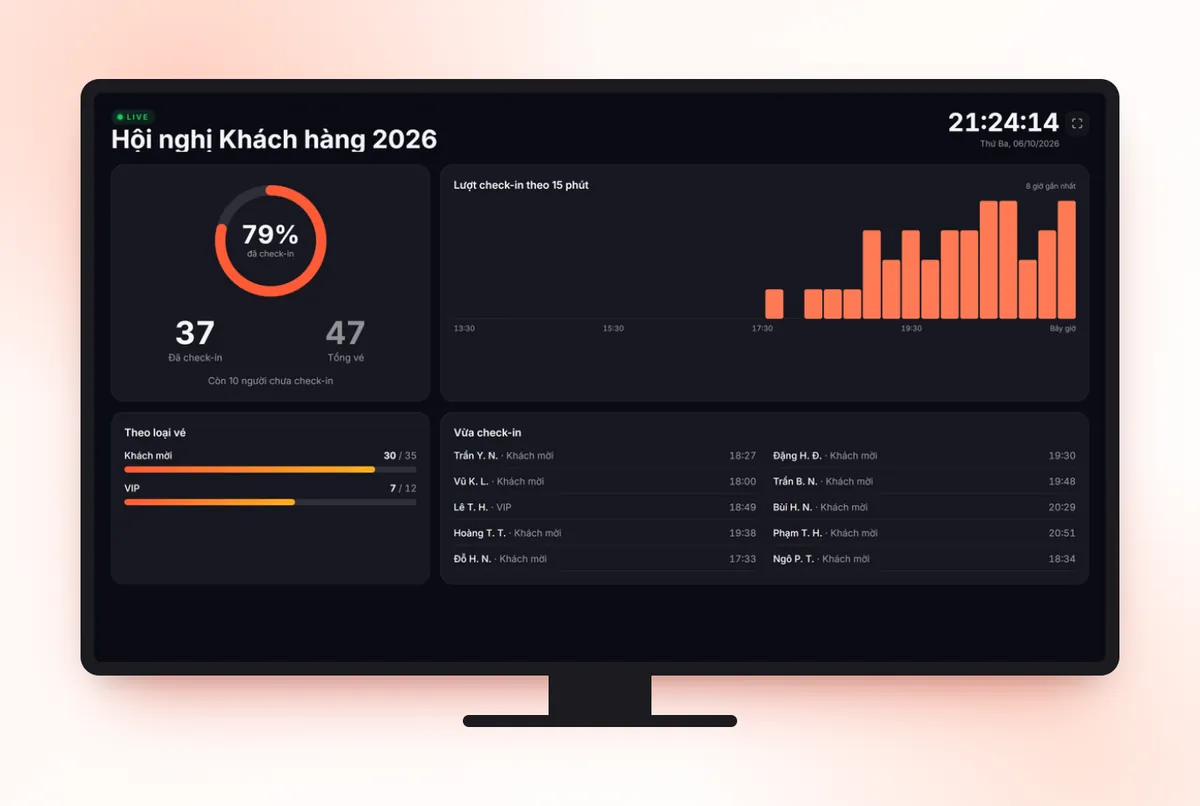
Show check-in progress on a TV or projector so organizers see at a glance how many attendees have arrived, through which gate and who is scanning. Numbers refresh every 5 seconds, and the projector needs no login.
On this page
What the screen shows
| Block | Content |
|---|---|
| Rate | A percentage ring of attendees checked in, with the Checked in count, Total tickets and the number not checked in yet. |
| Check-ins per 15 minutes | A bar chart of the last 8 hours, up to the current time. |
| By ticket type | A check-in progress bar for each ticket type. |
| Just checked in | The latest check-ins, with ticket type. |
| Tickets by check-in source | Successful check-ins by source: app, Studio web, self check-in kiosk, Tickmi Ticket app. |
| Tickets by scanner | Tickets each staff member has checked in successfully. Check-ins from the self check-in kiosk or the Tickmi Ticket app are grouped into the No account row. |
Text and numbers are large so they can be read from a distance, which suits a control room, a logistics area or near the entrance. Each ticket product has its own link. The by-source and by-scanner blocks only count successful check-ins, not duplicate or wrong-code scans; for more detail, use the Scan history tab (see Check-in stats by scan source).
If the projector loses its connection, the screen shows Connection lost — showing the latest numbers, retrying… and reconnects automatically when the network returns.
1. Turn on the display link
- In the Tickmi Studio web app, open the ticket product → Check-in group → Live stats screen.
- In the Display link block, switch on Enable display link.
- In the On-screen display block, enter a Screen title, for example "Gate A — VIP area". Leave it empty to use the ticket product name.
- Choose a Theme: Dark or Light, depending on the room's lighting.
- Click Save changes. The Preview shows what the screen will look like.
2. Choose how names appear in "Just checked in"
The Names in "Just checked in" setting has three options:
- Initials: recommended for public screens.
- Full: shows full names, suited to the organizers' internal screens.
- Hidden: the recent check-ins list is not shown.
This choice also applies to staff names in the Tickets by scanner block: with Initials staff names are abbreviated too, and with Hidden this block doesn't appear.
3. Open on a TV or projector
- In Display link, choose the display language (Tiếng Việt or English), then copy the link or use the accompanying QR code. Click Open screen to preview it on your current machine.
- Open the link in the browser of the TV or of the computer connected to the projector.
- Press F11 (or the full screen button at the top of the page) to go full screen.
The numbers combine every check-in source: app, kiosk, barcode reader and web check-in. See Check-in with the Tickmi Studio app and Self check-in kiosk.
4. Share and revoke the link
The link needs no login: anyone who has it can see the summary numbers. So only send it to people who need to follow along, for example the reception team lead or a sponsor.
- To revoke it, click Change link (disable the old one) and confirm with Change link.
- The old link and QR code stop working immediately; a screen still showing the old link will report This link does not exist or has been turned off.
- Reopen the TV with the new link.
Turn off Enable display link if you no longer need this screen.
5. Prepare before doors open
- Make sure the attendee list and ticket issuance quota are complete, because Total tickets follows the number of tickets issued for the ticket product (see Manage attendees).
- Open the link on the TV early and check the network connection and full screen mode.
- Have a team member scan one test ticket to see the numbers move on the screen.
- If you have several areas, set a clear Screen title so viewers know which ticket product they are watching.
Test scans are recorded in the history like real ones. If needed, set that ticket back to not checked in with Mark as not checked in in the Tickets tab.
Tip: show the stats screen in the organizers' area, and use the welcome screen in the reception lobby to show the names of people who just arrived. When the event ends, see the full numbers in the Summary report.
After check-in, you can move on to the live lucky draw with the people who have checked in. Learn more about Tickmi check-in software.
Frequently asked questions
How fast does the stats screen update?
The numbers refresh about every 5 seconds, with no need to reload the page.
Can people with the link see personal information?
The screen only has summary numbers, the recent check-ins list and tickets by scanner. You choose whether names appear as initials, in full, or hide both name lists completely.
What if I sent the link to the wrong person?
Click Change link (disable the old one). The old link and QR code stop working immediately, then reopen the screen with the new link.
The Tickmi team is here to help on hotline 0349 632 920, or try Tickmi for free and follow along.