
Knowledge
What belongs on a conference invitation ticket template and how to lay it out for readability
A conference invitation ticket is both an invitation and a pass at the gate. Leave out information and guests will ask you dozens of times; cram in too much and the QR code gets crowded out. This article divides the ticket into zones so you know what to print and what to keep elsewhere.
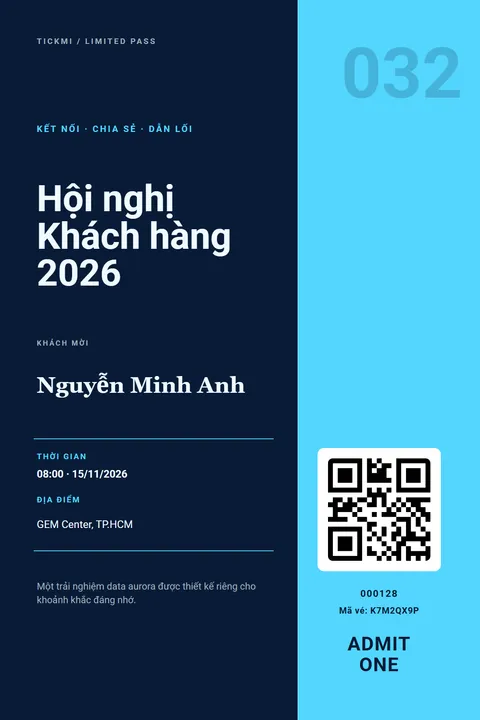
How does an invitation ticket differ from a sold ticket?
An invitation ticket is sent to someone you have chosen, so it carries the recipient's name, usually has no price, and must convey the feeling "you are our guest". Three things an invitation ticket has to do well. A conference invitation ticket is a form of electronic event ticket, sent by email or downloaded as an image.
- Instant recognition: at a glance, the recipient knows which program this invitation is for and from whom.
- Enough to arrive at the right place on time: no need to open another email or phone to ask.
- Fast entry: staff scan once and that's it, even when the recipient only opens the ticket on a phone.
The rest of this article follows that order, top to bottom, the way the eye reads a ticket. If you only need a simple invitation so guests can say whether they are coming, you can make a free online invitation card and turn on attendance confirmation in Tickmi Studio.
Zone 1: identifying the program
- Program name written exactly as in the invitation email and the registration page. Guests who see three places with three different names will suspect this is a ticket for another event.
- Organizer logo at the top corner. Group partner or sponsor logos into one small row, and don't let them compete with the program name.
- A line with the theme or slogan if you have one. This is the first thing to cut when the ticket gets crowded.
Zone 2: the recipient
- Full name is the second-largest text on the ticket, after the program name. The name is what makes the ticket "yours".
- Organization and title if you have collected them. For customer or partner conferences, this line helps gate staff greet the right person.
- Ticket type (Guest, VIP, Speaker, Press) written as a clearly visible label. Staff use it to point people to the right entrance.
Vietnamese names are often long and carry many diacritics. Test with the longest name in the list, not just a sample name like "Nguyen Van A". If some people have no title, that line will be empty and the ticket will look incomplete, so you need a way to hide a line when there is no data (see the design section below).
Zone 3: time and place
| Information | Print it? | Notes |
|---|---|---|
| Opening date and time | Required | State the day of the week clearly if the conference is at the weekend |
| Check-in start time | Recommended | Guests usually arrive at the opening time; an earlier gate opening helps avoid crowding |
| Venue name, floor and room | Required | If you only write "Convention Center X" without the floor or hall, guests still have to ask |
| Full address, map | Keep on the ticket page and in the email | A printed ticket can't hold a map; put the directions link where it can be clicked |
| Detailed program | Don't print | Programs change often; put it on the personal ticket page or in the email so it stays up to date |
| Dress code, parking, support contact | One small line at the foot of the ticket | Only include things that would confuse guests if they didn't know in advance |
Rule: information that can change should live somewhere you can edit. Tickmi has a personal ticket page with the QR code, add-to-calendar and directions buttons, so the ticket only needs to hold the core.
Zone 4: getting through the gate
- Each person's own QR code, large enough, with a white border around it, in an easy-to-find position. Details on size and contrast are in the article what is a QR code ticket.
- A short ticket code printed under the QR code. When the camera can't read it or the recipient only has a crumpled printout, staff type this code instead of scanning.
- One line of instruction such as "Show this code to check-in staff". It sounds redundant, but first-time guests really need it.
Don't print the recipient's phone number, email or sensitive information on the ticket. Tickets are easily shared or posted online; see also protecting attendee data.
Variants by guest type: one template or several?
| Ticket type | Differences worth having on the ticket |
|---|---|
| Guest | The standard template, in the program's identity colors |
| VIP | A prominent VIP label, a different accent color, plus a separate entrance or seating area if there is one |
| Speaker | Their speaking session, the green room or the backstage contact person |
| Press | A press label, the working area and photography rules if any |
Two common approaches: create one ticket template per type (easy to adjust separately, but a shared change has to be made in many places), or use one template and let labels like "VIP" show only for the right type. Under 3-4 types, use one template to keep things simple; when each type differs a lot in content, separate templates are easier to manage. The article VIP reception covers the operational side.
One-sided or two-sided tickets?
The front holds the invitation, the recipient's name and the QR code. The back (if needed) is for a summary program, seating plan or travel notes. When sending e-tickets, two sides are two separate images, and recipients usually only look at the first. So always put the QR code on the front, and keep the back for "good to know" information. If you plan to print two-sided paper tickets, test on the exact paper and printer you will use.
Building a conference ticket template in Tickmi Studio
- Go to Template library → E-ticket templates, click Choose from template gallery and pick a conference template close to your identity, or click Create ticket template if you want to build your own.
- Replace the logo, program name, date, time and venue. Use Theme to change the whole color set to match your brand identity.
- Select the recipient name text, click Auto-fill info and choose the field (full name, organization, ticket type). Set Maximum lines so long names are truncated instead of overflowing the frame.
- For lines that may be empty such as the title, use Conditional display: show only when the field has data. The same mechanism lets the "VIP" label appear only for VIP guests.
- Add a QR code element. The real code for each ticket is generated at issuance, and the template only holds the position.
- Click Test render with sample data to see the ticket built by the actual issuing system, then go to Settings → Ticket types, choose the Ticket template and the Issued ticket file format (Image, PDF or HTML; see which format to choose).
- If you print on paper, turn on Print area in Alignment aids so the text and QR sit within the safe area.
The full guide to each button is in designing e-tickets and the template library; for the overall solution, see e-ticket design.
If you don't use a platform yet: manual works too
For a list of a few dozen people, you can design the ticket in graphic software or PowerPoint, create QR codes with a separate tool, then export one file per name. The most laborious part is one file per person: a single typo on the template means redoing everything, and one QR code shared by the whole list can't tell people apart (see bulk QR codes from Excel). The bigger the list, the greater the time cost.
Common mistakes on conference invitation tickets
- Too many logos, too much text. When everything is big, nothing stands out. Each zone should have just one focal point.
- Thin text, light colors over a photo background. Beautiful on a design screen but hard to read on a phone in the sun.
- Forgetting the short ticket code. When scanning fails, staff have no quick way to look it up.
- Printing the wrong size. A ticket designed at one size and printed at another distorts the QR code or pushes it to the edge.
- Not testing with real data. A template only works with short names; test render long names, long organizations and empty fields.
- The ticket doesn't match the invitation email. The same program with different names and colors makes recipients suspicious. See also how to write an event invitation email.
About Tickmi
Tickmi is a ticketing and attendee experience platform (Ticketing & Participant Experience Platform). On one unified attendee dataset, Tickmi connects the whole journey: issuing invitation, registration and paid tickets, sending branded QR tickets, check-in by app, kiosk or scanner — even offline — then the welcome screen, lucky draw, voting, quizzes and surveys. Tickmi is trusted by organisations such as Viettel, VNPT, MobiFone, FPT and CMC. Learn about Tickmi or try it free.
Frequently asked questions
What is the minimum information a conference invitation ticket needs?
The program name, recipient name, ticket type, date and time, venue (with floor or room) and a unique QR code. Add a short ticket code so staff can type it in when scanning fails.
Should I print the detailed program on the ticket?
No. Programs change easily and a ticket that has been sent can't be edited. Put the program on the personal ticket page or in the email so it stays up to date, and keep only fixed information on the ticket.
Do I need a separate template for VIP and press tickets?
Not necessarily. You can use one template and let a VIP or Press label show only for the right ticket type, or create one template per type when the content differs a lot. In Tickmi, you assign a template to each ticket type.
If I edit the ticket template after sending, do old tickets change too?
They don't change automatically. In Tickmi Studio, select the tickets to update and use Reissue ticket to rebuild the QR code and ticket file from the latest design.
Should invitation tickets be sent as an image or a PDF?
Images open quickly on phones, PDFs are convenient to print, and HTML displays flexibly. Each format has its own strengths, depending on which device your guests open the ticket on.
Issue QR tickets, send emails, check in and engage attendees on one platform.