
Knowledge
How to do QR code check-in: 7 steps from the list to the entrance
QR code check-in has three parts: each attendee receives a ticket with their own QR code, staff at the gate scan the code with a phone or a scanner, and the system records who came in and when. This article follows a timeline, from one week before the event to after it ends, so you can do it yourself in Tickmi Studio without a technical team.
Summary: what do you need to prepare for QR code check-in?
You need four things: an attendee list, a ticket with its own QR code for each person, accounts for scanning staff, and a rehearsal. Without a rehearsal, most problems show up exactly when attendees are standing in line.
| Milestone | Main task | Who |
|---|---|---|
| T-7 days | Create ticket types, decide how to receive the list, set the number of check-ins per ticket | Organizers |
| T-5 to T-2 | Issue tickets, send QR tickets by email or Zalo | Organizers |
| T-2 days | Create Check-in staff accounts, install the app | Admin |
| T-1 day | Rehearse at the venue, download offline data if the signal is weak | Gate lead |
| Event day | Scan tickets, handle situations at the gate | Check-in staff |
| After the event | Review the scan history, reconcile, export data | Organizers |
Step 1 (T-7): create ticket types and decide how many times each ticket can be scanned
The most important decision at this step is the Number of check-ins per ticket. Enter 1 if each ticket may enter only once. Enter a larger number if the event runs over several days or attendees come and go several times.
- A single-session conference: leave it at 1, and a ticket scanned a second time will show that it was already checked in.
- A 3-day exhibition with one shared ticket: set 3, or split into 3 ticket types by day if you want clearer numbers for each day.
- A program with several booths or sessions: use a separate scanner account for each point so you can filter by scanner later.
Each ticket type is tied to a ticket template (where the QR code and attendee name go) and an email template. How to design a ticket template is in the ticket design guide.
For fairs and exhibitions with many desks, also see the exhibition and fair check-in page.
Step 2 (T-7 to T-3): get the attendee list into the system
There are three ways to add people to the list. Choose based on whether you already have a list:
- You already have a file: use Import Excel in the Attendees section. Note: Excel import only adds new people and does not update existing ones, so clean the file first (duplicate emails, wrong phone numbers).
- A few people, added one by one: click Add attendee and fill it in by hand.
- No list yet: open a registration page so attendees fill in their own details. See online registration page if you need a form with approval.
Agree from the start which columns are required. Without an email you cannot send tickets by email; without a phone number you cannot send through Zalo.
Step 3 (T-5 to T-2): issue and send tickets with QR codes
Each attendee receives a ticket with its own QR code and an 8-character Ticket code printed on the ticket. The Ticket code is the fallback when the QR code cannot be scanned.
- Turn on Automatically send email when an attendee is approved if you want the ticket to go out as soon as the attendee is added or approved.
- To send through Zalo to a phone number, also turn on the Zalo channel; the Zalo message has a button that opens the ticket page with the QR code.
- Send a test to yourself first and open it on your phone to check that the QR code is large and clear enough.
Every ticket issued, including a reissue, counts as one ticket issuance quota. New accounts get 100 free ticket issuance quota; see the pricing page for how it is counted. How to send in bulk is in the article sending QR tickets in bulk by email.
Step 4 (T-2): create accounts for the staff who scan QR codes
Do not give the admin account to the whole gate team. Go to the organization's members section, click Add member and choose the Check-in staff role. This role can only scan tickets, cannot view or edit other data, and can only sign in to the check-in app on the phone.
Create one account per person. The benefit shows after the event: the Scan history has a By scanner section that shows how many scans each account made and how many successful check-ins.
Step 5 (T-1): rehearse QR code check-in at the venue
The rehearsal takes only about 20 minutes but avoids almost every problem on the main day. Use 2–3 test tickets and do all of the following:
- [ ] Each staff member signs in to the Tickmi Studio app on their own device and allows camera permission.
- [ ] Scan one ticket on a phone screen and one printed ticket.
- [ ] Scan the same ticket again to see the already-used screen.
- [ ] Try typing a Ticket code with Enter ticket code, in case a QR code is blurry.
- [ ] Stand at the real check-in desk position and check the lighting; if it is dim, turn on the Flashlight in the app.
- [ ] If the venue has a weak signal: go to Offline check-in and tap Download offline data while still online.
How to lay out lanes and how many staff for your crowd size is in the article check-in lane layout.
Step 6 (event day): scan and handle situations at the gate
At the gate, staff only need to read the result screen and follow the table below. Agree beforehand who decides the difficult cases so the lane does not stop.
| The app shows | It means | What staff do |
|---|---|---|
| Check-in successful | The ticket is valid and recorded | Let them in, scan the next person |
| Already used | The ticket was scanned before, with the time of the first scan | Ask again, pass to the team lead if you suspect a shared ticket |
| Invalid ticket | The ticket was not found or the code is wrong | Ask for their name, search the list by name or ticket code |
| Cancelled | The organizers cancelled the ticket | Do not let them through automatically, send them to the help desk |
An attendee who forgot their ticket or whose phone battery died: search the list by name, phone number or email, then check them in manually. Harder cases are in the article handling situations at the check-in desk.
Step 7 (after the event): read the scan history to reconcile
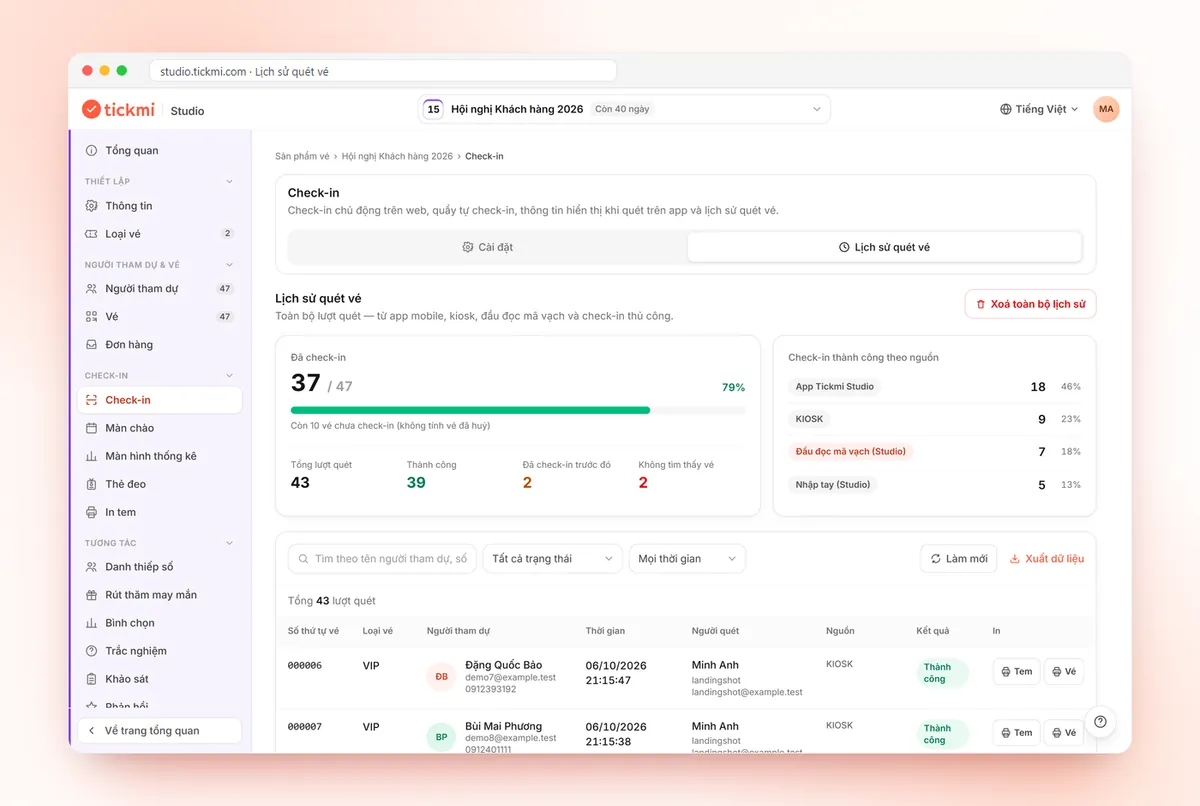
The Scan history gathers every scan from the app, kiosks, barcode readers and manual check-ins. The first three numbers to look at are Successful, Already checked in and Ticket not found.
- A high rate of "Already checked in" is usually because attendees showed the code several times or staff scanned twice, not necessarily fraud.
- If "Ticket not found" is high, check whether someone used a ticket image from another event or whether codes were photographed blurry.
- Filter by Scanner and Source to see which gate is busy and which has too many staff.
Common mistakes with QR code check-in
| Mistake | Consequence | How to avoid it |
|---|---|---|
| Sharing one account across the whole team | You do not know who scanned, and errors are hard to trace | One Check-in staff account per person |
| Leaving Number of check-ins per ticket = 1 for a multi-day event | On day two the ticket shows as already used | Set the right number of days or split ticket types by day |
| Sending tickets right before the event | Attendees do not have time to open the email and crowd the gate | Send 2–5 days ahead, remind the day before |
| Skipping the rehearsal | Camera permission problems, poor lighting and wrong accounts show up when it is crowded | Rehearse at T-1 using the checklist in step 5 |
To see all the scanning features, the check-in statistics screen and the self check-in kiosk in one place, open Tickmi's QR code check-in page or the event check-in software page.
The timeline examples in this article are suggestions; adjust them to the size of your event. Written by the Tickmi team, updated 23/10/2026.
About Tickmi
Tickmi is a ticketing and participant experience platform. On a single, unified set of attendee data, Tickmi connects the whole journey: issuing invitation, registration and paid tickets, sending branded QR tickets, checking in with an app, kiosk or scanner (even offline), and then moving on to the welcome screen, lucky draw, polls, quizzes and surveys. Tickmi is trusted by organizations such as Viettel, VNPT, MobiFone, FPT and CMC. Learn about Tickmi or try it free.
Frequently asked questions
Does QR code check-in require a dedicated scanner?
Not necessarily. Staff can scan QR codes and barcodes with a phone running the Tickmi Studio app. Handheld scanners or kiosks are only needed when a very large crowd comes in or when you want attendees to scan by themselves.
What if the QR code cannot be scanned?
Use the Enter ticket code box in the app to type the 8-character Ticket code printed on the ticket, or find the attendee by name, phone number or email and check them in manually.
Can one ticket be checked in more than once?
Yes. In the ticket type settings, set Number of check-ins per ticket to more than 1, for example for multi-day events or when people come and go several times.
Can I still check in with QR codes if the venue loses its network?
Yes, if you tapped Download offline data in the app while still online. Scans are stored on the device and sync automatically when the network is back, while the app is open.
Can check-in staff see attendee data?
The Check-in staff role can only scan tickets in the check-in app and cannot view or edit other data. The information shown on a scan is chosen by the organizers and can be partly masked.
Issue QR tickets, send emails, check in and engage attendees on one platform.