
Knowledge
One person registering for many: how to keep group registration tidy
Group registration lets one person (a group leader, secretary or parent) reserve places for many people in a single form submission. The approach depends on one question: do you need to know each member's name? If not, just let people choose the number of tickets per registration; if so, collect information per ticket or receive the group list and enter it into the system. This article walks through all three approaches, with a decision table and common mistakes.
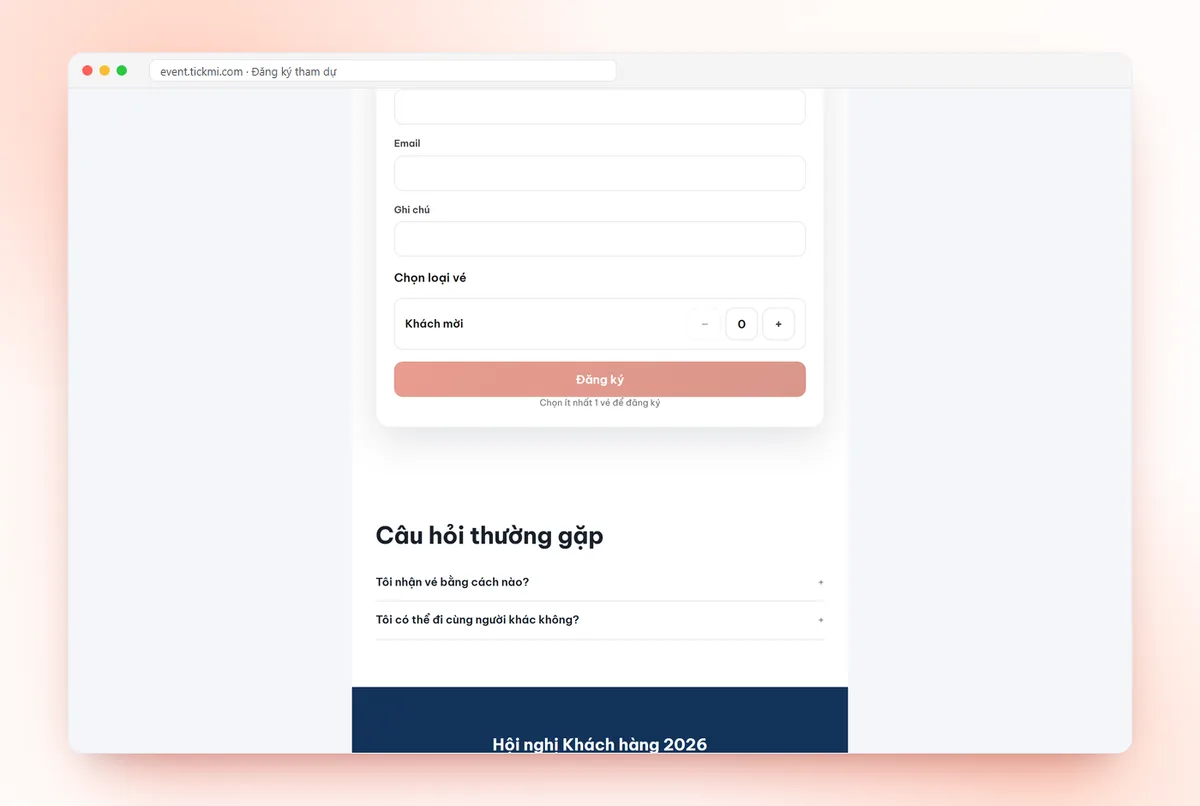
Group registration: a quick answer in 4 lines
- You only need the headcount: let registrants choose the number of tickets (for example up to 5 tickets per registration). All tickets belong to the registrant and are sent to their email.
- You need each person's name, ticketed event: turn on attendee information collection for each ticket at purchase, and each ticket is sent to that person's own email.
- You need each person's name, free event with a large group: receive the group list in Excel, import it into the attendee list, then send tickets to each person.
- You want to stop one person holding too many places: set a cap on tickets per registration and on how many times one email or phone number can register.
Why does group registration need its own design?
The default registration form assumes each person registers for themselves. In reality many events have people registering on behalf of others: a company sends 6 employees to a seminar, a parent registers 2 children for a fair, a club brings 20 athletes to a race. Forcing everyone to fill in the form themselves loses people, because the group leader has to chase each member. Conversely, allowing group registration without limits lets one person hold too many places at an event with limited capacity.
So before you open the online registration page, answer three questions: how many people does a group usually have, do you need each person's name and contact details, and does each person need their own code at the gate?
Approach 1: let people choose the number of tickets in one registration
This is the fastest approach when you only need the total number of people. In Tickmi Studio, each ticket type has an Open registration tab, in which the Maximum tickets per registration field decides how many tickets the person filling in the form can choose. Set it to 1 if each person only registers for themselves; set it higher if you allow registering together with companions. On the form, registrants see − and + buttons next to each ticket type, as in the image at the top of the article.
What you need to understand clearly: one registration creates one attendee, the person who fills in the form, along with the number of tickets they choose. Each ticket has its own QR code, but all are in the registrant's name and sent to their email. The group leader then passes tickets on to each member, or keeps them all and goes through the gate with the group.
This approach suits families, groups of friends, small groups of up to about 5 to 10 people, and events that do not need personal name badges. Detailed steps are in the guide creating a registration page and setting limits.
Approach 2: collect each person's information when buying group tickets
For ticketed events, Tickmi has the option Enter attendee information when buying tickets in the ticket sales settings of the ticket product. When it is on, the buyer enters a full name and email (phone number optional) for each ticket; each ticket is a separate attendee and the ticket is sent to that person's email. When it is off, the buyer is the attendee for every ticket in the order and all tickets are sent to the buyer's email.
Turn this option on when you need to print name badges, send separate materials or track who has arrived. Turn it off when buyers are usually parents buying for young children, or when entering many names would slow down payment. The maximum number of tickets per purchase is decided by the Maximum per order field in the On sale tab. See also the guide to selling tickets online.
Approach 3: receive the group list and import it into the system
For large groups at a free event, for example each unit sending 30 people to a conference, the neatest approach is usually to ask the group leader to send a list in your template file (full name, email, phone number, unit). You import that file into the attendee list, with each row becoming an attendee with their own ticket, then send tickets to each person by email.
Note: Excel import only adds new people and does not update existing ones. If a group sends back a corrected version, filter out the new people to import, and edit people whose details changed directly. How to add, import and send tickets is in the guide managing attendees.
Table for choosing a group registration approach
| Situation | Approach to use | Tickets sent to | Personal name badges |
|---|---|---|---|
| Families, groups of friends, small groups, free events | Approach 1: choose tickets per registration | Registrant's email | Not suitable |
| Ticketed events, need to know each person | Approach 2: information per ticket at purchase | Each person's email | Suitable |
| Ticketed events, buyer is a parent | Approach 2 but with per-ticket information turned off | Buyer's email | Not suitable |
| Large unit groups, free events | Approach 3: import the group list | Each person's email | Suitable |
Limiting group registration so no one holds too many places
Group registration is convenient but easy to abuse when places are limited. Besides maximum tickets per registration, the Open registration tab also has Maximum times 1 email can register and Maximum times 1 phone number can register; leaving them blank means no limit. Combining these two layers, one person cannot register repeatedly to hoard tickets. If you want to vet each group before issuing tickets, turn off Auto-approve registrations to approve manually.
Tickmi does not close registration automatically when capacity is reached, so you need to watch the number registered and set an appropriate Registration until time. How to balance the number of places is covered in registration forms with a capacity limit.
Checking in a group at the gate
Each ticket has its own QR code, so scanning one code records only one person entering. With Approach 1, the group leader can hand over the tickets on their phone one by one for staff to scan, or forward the ticket images to each member in advance. The check-in screen will show the registrant's name on every ticket in the group, so do not use the name on screen to verify individual members. With Approaches 2 and 3, each person arrives with a ticket in their own name and checks in as normal.
If a large group arrives at the same time, set aside a separate lane for groups so you do not slow down individual arrivals.
Hypothetical example: a career seminar for school groups
Suppose you are organizing a free seminar with 300 places, with guests mostly students attending as school groups. You create two ticket types: "Individual" with maximum tickets per registration set to 2 so students can bring one friend, and "School group" issued only by importing the list sent by lecturers, one ticket per student in their own name. You set each email to register only once for the "Individual" type, and approve manually to vet registrations before issuing tickets.
Common mistakes when opening group registration
- Setting tickets per registration too high: one person holds a dozen places and then does not bring everyone, leaving others short. See also how to reduce registrants who do not show up.
- Needing name badges but choosing Approach 1: every ticket is in the group leader's name, so printed badges will have the wrong names.
- Not saying so on the form: registrants do not know whose email the tickets will be sent to. Add one short line in the introduction.
- Re-importing the whole group file after a change: Excel import only adds new people, so import only the additions.
You can try it with 100 free ticket issuances; for details of the plans, see the pricing page.
About Tickmi
Tickmi is a ticketing and participant experience platform. On a single, unified set of attendee data, Tickmi connects the whole journey: issuing invitation, registration and paid tickets, sending branded QR tickets, checking in with an app, kiosk or scanner (even offline), and then moving on to the welcome screen, lucky draw, polls, quizzes and surveys. Tickmi is trusted by organizations such as Viettel, VNPT, MobiFone, FPT and CMC. Learn about Tickmi or try it free.
Frequently asked questions
Can one person register for several people on Tickmi?
Yes. In the Open registration tab of the ticket type, set Maximum tickets per registration to more than 1. The person filling in the form chooses the number of tickets with the − and + buttons, and all tickets are in the registrant's name and sent to their email.
How can each member of a group receive a ticket in their own name?
For ticketed events, turn on Enter attendee information when buying tickets so the buyer enters a full name and email for each ticket. For free events, receive the group list, import the Excel file into the attendee list, then send tickets to each person.
How do I stop one person registering for too many places?
Set Maximum tickets per registration, along with Maximum times 1 email and 1 phone number can register. For closer vetting, turn off Auto-approve registrations to approve each registration manually.
How does a group that registered together check in?
Each ticket has its own QR code and one scan covers one person. The group leader can hand over each ticket to be scanned, or forward ticket images to members in advance.
How many tickets can one registration include at most?
You set it in Maximum tickets per registration for each ticket type. The system also caps it at 100 tickets per type in a single registration.
Issue QR tickets, send emails, check in and engage attendees on one platform.