
Knowledge
RSVP confirmation by link in email: how to set it up step by step
After sending invitations without knowing who will come, it is very hard to settle seat counts, meals or gifts. The neatest way is to put a personal confirmation link for each person in the email: one click and you know "Attending" or "Not attending". This article walks through the whole setup in Tickmi Studio, from inserting the link into the email to reading the results.
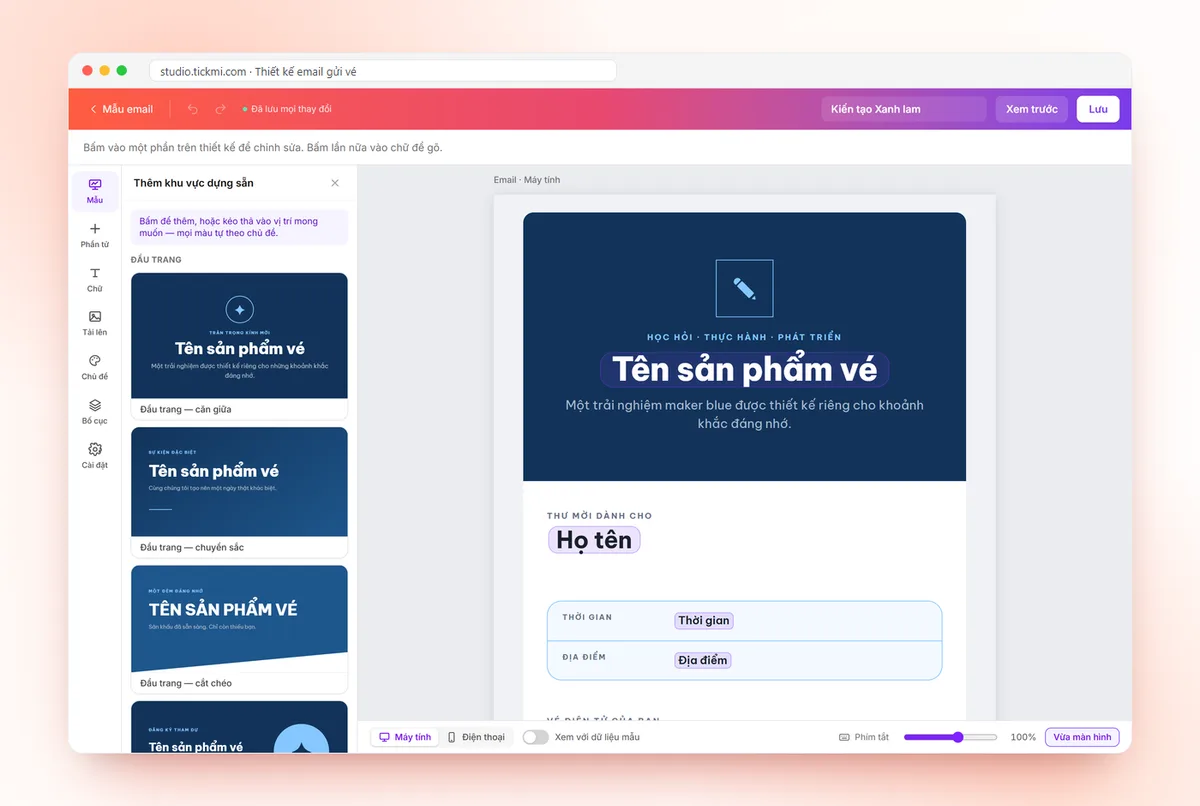
How the attendance confirmation link works
Each email recipient has their own link, tied to exactly their ticket. When they click it, the attendee sees a simple page, with no sign-in required, asking "Will you attend?" with two options, I will attend and I can't attend. The answer is recorded directly in the event's ticket list, so organizers don't have to read each reply email or compile by hand.
This approach suits conference, gala, appreciation ceremony or customer meeting invitations, where you invite a defined list and need to know how many people actually come. You can read more about the business side in attendance confirmation (RSVP) for events; this article focuses on the operation.
Step 1: insert the Confirmation link element into the email template
- Open the email template designer in Tickmi Studio.
- Add the Confirmation link element where you want it, usually under the invitation text and above the view-ticket button.
- Choose the Confirmation page language if your guest list uses Vietnamese or English.
The link is filled in automatically when sending, so you don't have to create a separate link for each person. This element works for every ticket product. Details on the email designer are in the email design guide.
Step 2: choose what to ask on the confirmation page
In the element's Information on the confirmation page section, you turn each item on or off:
| Item | What it is for |
|---|---|
| Attendance confirmation | The main question: attending or not. This is the default item |
| Reason for declining | Only shown when the recipient chooses Not attending. Useful to know whether they have a schedule conflict or need to send a substitute |
| Custom fields of type Text or Choice | Ask more: vegetarian or regular meal, how many people coming along, shirt size. Only shown when the recipient chooses to attend |
Note: Image-type fields cannot be used on this page yet, and Studio will warn you if you turn off every item so that the confirmation page is empty. To add a new question, create it first in the organization's attendee information fields and then turn it on here.
Step 3: send the email and let recipients respond
Attach the email template you just designed to the ticket type, then send tickets as usual. Recipients click the link, choose one of the two buttons, can write a reason and then click Submit confirmation. The page says "Thank you, see you there!" or "Noted that you can't attend".
Recipients can change their mind: open the link again, click Change response and submit again. The page shows the deadline for changes, so you don't need to tell them separately. For bulk ticket sending, see also the guide to sending QR tickets in bulk by email.
Step 4: read the results in the ticket list
- The ticket list has a Confirmation column for each person.
- The filter has four options: All confirmations, Attending, Not attending and No response.
- The stats section shows the total confirmed attending along with the number not attending.
Filtering by No response and resending the email is the fastest way to nudge exactly the people who are still silent. Tickmi does not currently send reminders automatically, so you do this reminder step manually. Once finalized, the "Attending" list is the figure for reserving seats, meals and printing badges.
Hypothetical example: a gala invitation for 120 guests
Suppose you are hosting a customer appreciation gala, inviting 120 people and needing to finalize the table count 7 days ahead. You import the guest list into Tickmi, design an invitation email with the Confirmation link element, turn on an extra Choice field "Meal" (regular or vegetarian) and send tickets. After 3 days, you filter No response and resend the email to this group with a short note in the template content. At the deadline, you filter Attending to get the table count and the number of vegetarian meals, while the Not attending group with the reasons recorded helps you know whom to invite as a replacement. This is an illustrative process example, not real figures from a specific event.
The key point: you don't need a separate summary file. The ticket list is at once the invitation list, the confirmation list and the check-in list on the day, so all the numbers always match. On the day, those who confirmed still enter the gate with the QR code on their ticket as usual; see also event check-in software.
Limits to know before sending
| Situation | What happens |
|---|---|
| Response deadline passed | The page says "The response deadline for this ticket has passed". The deadline is based on the event's end time |
| Ticket has been canceled | The recipient can't respond |
| Recipient has already checked in | They can't choose I can't attend |
| Recipient opens the link on a phone | It works, with no sign-in or app installation needed |
Common mistakes
- Forgetting to insert the element into the template in use. Send a test email to yourself and click the link before sending in bulk.
- Asking too much. Every extra question lowers the number of people who finish; keep only the information you actually use.
- Sending once and then waiting. Resend to the No response group a few days before the deadline.
- Confusing "no response" with "not coming". People who haven't responded may still come; decide how much to prepare based on both groups.
The toolkit for QR invitations, email design and bulk sending is in Tickmi's QR invitation tickets and invitations solution. You can start with 100 free ticket issuances.
About Tickmi
Tickmi is a ticketing and attendee experience platform (Ticketing & Participant Experience Platform). On a single, unified set of attendee data, Tickmi connects the whole journey: issuing invitation, registration and paid tickets, sending branded QR tickets, checking in with the app, kiosk or scanner (even when the network is down), and then welcome screens, lucky draws, voting, quizzes and surveys. Tickmi is trusted by organizations such as Viettel, VNPT, MobiFone, FPT and CMC. Learn about Tickmi or try it free.
Frequently asked questions
Do recipients need to sign in to confirm attendance?
No. They just click their personal link in the email, choose I will attend or I can't attend and then click Submit confirmation.
Can recipients change their mind after confirming?
Yes. They open the link again, click Change response and submit again, as long as the response deadline shown on the page has not passed.
Does Tickmi automatically send reminders to people who haven't responded?
There are no automatic reminders at the moment. You filter the No response group in the ticket list and resend the email to that group.
Can I ask for extra information such as vegetarian meals or how many people are coming along?
Yes, using custom fields of type Text or Choice. These questions only show when the recipient chooses to attend. Image-type fields cannot be used on this page yet.
Can someone who has already checked in say they are not attending?
No. For a ticket that has been checked in, Tickmi does not allow choosing I can't attend.
Issue QR tickets, send emails, check in and engage attendees on one platform.